• Required reading for all forum users!!!

    Welcome!
    Register to access the full functionality of the GSResources forum. Until you register and activate your account you will not have full forum access, nor will you be able to post or reply to messages.

    A note to new registrants...
    All new forum registrations must be activated via email before you have full access to the forum.

    A Special Note about Email accounts!
    DO NOT SIGN UP USING hotmail, outlook, gmx, sbcglobal, att, bellsouth or email.com. They delete our forum signup emails.

    A note to old forum members...
    I receive numerous requests from people who can no longer log in because their accounts were deleted. As mentioned in the forum FAQ, user accounts are deleted if you haven't logged in for the past 6 months. If you can't log in, then create a new forum account. If you don't get an error message, then check your email account for an activation message. If you get a message stating that the email address is already in use, then your account still exists so follow the instructions in the forum FAQ for resetting your password.

    Have you forgotten your password or have a new email address? Then read the forum FAQ for details on how to reset it.

    Any email requests for "can't log in anymore" problems or "lost my password" problems will be deleted. Read the forum FAQ and follow the instructions there - that's what we have one for...

  • Returning Visitors

    If you are a returning visitor who never received your confirmation email, then odds are your email provider is blockinig emails from our server. The only thing that can be done to get around this is you will have to try creating another forum account using an email address from another domain.

    If you are a returning visitor to the forum and can't log in using your old forum name and password but used to be able to then chances are your account is deleted. Purges of the databases are done regularly. You will have to create a new forum account and you should be all set.

Owner by proxy

  • Thread starter Thread starter jtyson
  • Start date Start date
J

jtyson

Guest
Clever titles are tough eh? Seriously though, my buddy bought a 1981 GS1000 a couple days ago. He has zero mechanical knowledge and almost zero motorcycle experience in the last 10 years. He is also broke and wants to use this bike as his primary mode of transportation for the next few months so his wife and son can use his truck without having to take him to work everyday. So, it has been left in my hands to iron out the problems and teach him how to ride again.

Damn I'm a good friend...I'm not a professional mechanic, but I've got functional knowledge of most aspects of vintage bikes. Minimal practical application experience though, so I'll be leaning on the great people of this forum and others for guidance.

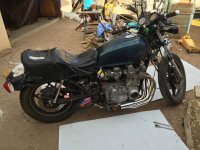
Paid $600 for it. Clean title and new tires. Not running right though. Not firing on cylinder #2. Starts up right away with very minimal use of choke. Came with stock exhaust as well as a 4 to 1 pipe. Came with pods - I asked about the stock air box, but he said he bought the bike without it. Did give us the chrome covers for the air box though.

It rode well enough for me to not trailer it the 3 miles back to my place. Over the last couple days, I've only had a couple hours total to look into it. I'd like to summarize where I'm at, and where I intend to go ultimately.

My friend is 5'1" and heavy. So even with short shocks, he still can't touch the ground. So, this thing has been "ghetto hard tailed" with a simple set of tubes in place of the shocks. Yes we are aware that negatively affects the handling of the motorcycle and decreases the comfort of the ride. I'm going to cut a seat pan and turn some heavy short springs to make up some comfort while keeping it short enough for him to touch the ground. I'm aware that bobbing/chopping is sacrilege, but it is necessary in this case.

I found out that the #2 cylinder wasn't firing because the previous owner had run the vacuum line to the vent on the tank instead of the petcock. Switched that and #2 was back online. However, the bike was still choking between 3k-7k rpms. Running lean right?

Previous owner said they cleaned carbs, replaced plugs, changed oil.

The stock exhaust was on the bike and we took the 4 to 1 home in the truck. The stock exhaust was not bolted on completely, so it was leaking bad. I pulled it off to inspect and found that none of the sleeves were in place, so there is no way these are going to seal. Called a few local shops to see if we can get sleeves. In the meantime, I bolted up the 4 to 1 and it seals up well. However, I believe we are missing a piece, because the muffler supplied with the 4-1 will not fit correctly, it jams the brake pedal up. I tried running the bike open header, but it just wouldn't do it. I crammed the muffler on there awkwardly just to test, and sure enough, in neutral and warmed up, no more choking through the RPM range. I took a test ride to the gas station about 1/4 mile away and it is still choking while in gear at 25%-75% throttle. At WOT, once it climbs past 6-7k rpms, it rips. That thing moves.

The #1 carb is overflowing when parked. So either something is worn out or they didn't set the float right. Either way, the carbs will need to come off for me to inspect, clean and check what jets are in there to see where I need to go from here. Also need to find information on tuning carbs for elevation as well as mods.

The petcock is probably bad, because a previous owner installed an in-line cutoff. I don't know if we will buy another, rebuild, or just forget it. Ultimately, I'm the brains and the skills, he is the bankroll - and his wallet is both anorexic and very rusty.

I have not checked the valves. Honestly, I don't know how. I've never adjusted valves on anything, I've always had someone else do it. I'll probably start looking to see what I can find as far as How To's go.

I'm hoping to be able to get it running pretty smooth with the pods and the 4-1. Since I had to lower it so much, I need to modify the kickstand so it doesn't fall over if the wind blows and I can't do that with the stock flute on the left side.

BikeCliff's website is an awesome culmination of information. Though I will say, I have a hard time reading the yellow background pages. Bother my eyes for some reason. But oh well, small price to pay.

Sorry my first post is so crazy long, but I wanted to be as thorough as possible in case anyone decides they want to chime in on my issues. Please excuse my messy driveway - I'm a self employed handyman/fabricator and that is where the magic happens...haha!

attachment.php
 

Attachments

  • IMG_3430.jpg
    IMG_3430.jpg
    95.9 KB · Views: 0
Last edited:
Looks to be a sidewinder 4-1. which is why it doesn't want to line up. You will lose a ton of clearance on that side, I would put the stocker back on and grab some exhaust gaskets from Z1.

You will need shims for a valve adjustment. Get that done before going any further. Send ghostgs a pm here for the shim club.
 
And go here for a manual and the CV carb tutorial is on the right side as you scroll down from the manuals menu board. Set the top mixture screws ( at the top rear of the carb throats at around 2 3/4 out from gently seated at the bottom of the holes. This will give you the best baseline to start from.
Once the valves are done and the carbs reinspected, do the vacuum syncing. It will be a totally different bike then.

http://members.dslextreme.com/users/bikecliff/
 
Welcome to the forum. What a good friend you are. ;) Good luck with the project.
 
Welcome to the forum!

I hope you find all the info you need but I gotta say... buying a vintage motorbike that needs lots of fixing up is not really the most economical choice from a financial perspective. I see a $600 bike that needs $1000-$1500 worth of parts just to be roadworthy and for that amount, you can easily find something more modern and ready to ride. I did this with my 850GL but I approached it from the perspective of gaining an education in motorcycle maintenance (which I most certainly got). Hopefully your friend is able to help you and learn along the way.

At least it's good riding all year around and you don't have to worry too much about rust. :)
 
Looks to be a sidewinder 4-1. which is why it doesn't want to line up. You will lose a ton of clearance on that side, I would put the stocker back on and grab some exhaust gaskets from Z1. You will need shims for a valve adjustment. Get that done before going any further. Send ghostgs a pm here for the shim club.
Yeah I realize clearance will be poor with this piece, no matter how I fabricate anything, especially since we dropped the bike almost 4" in the rear. Unfortunately though, for me to use the stock pipes, I'm going to have to cut the mufflers off. Otherwise I won't be able to modify the kickstand as necessary and still have it fold up. I did google "sidewinder gs1000" and found a bunch of V&H info, but they all look different from this one. Is this made by a different brand? I'll see if I can find ghostgs on here, but ultimately I'm trying to get this thing going this weekend, so I don't know if I'll be able to get anything from anyone on here in time. Probably have to buy whatever shims I need locally. Assuming I can find them of course. Unless there are any special tools I need, then I may be dead in the water either way.
And go here for a manual and the CV carb tutorial is on the right side as you scroll down from the manuals menu board. Set the top mixture screws ( at the top rear of the carb throats at around 2 3/4 out from gently seated at the bottom of the holes. This will give you the best baseline to start from. Once the valves are done and the carbs reinspected, do the vacuum syncing. It will be a totally different bike then. http://members.dslextreme.com/users/bikecliff/
I did find that site and have started reading and bookmarking stuff. Lots of info on there. The valve guide on there is for the 850gt it looks like. Will that be the same as the 1000? I haven't had the chance to read through it entirely yet. I don't have a carb sync kit. Know anywhere that sells a relatively cheap one? Truth is, I prefer working on fuel injection, so I'd like to not spend a ton of money acquiring carb tools. I know I can make one with bottles and hoses, as I have done that before with a friend, but I'm sure that isn't very accurate, and I'd still have the buy the adapters for the manifolds anyway.
Welcome to the forum. What a good friend you are. ;) Good luck with the project.
The more time I spend on here reading about what needs to be done makes me realize I should probably learn how to tell people no more often.
 
Don't wimp out on the carb sync tool. Carbtune.com will get you the best value for your money (just over $100), and you can use it for fuel injected engines, too. :encouragement:

.
 
I think I am in need of some assistance. Either I don't know what I am doing checking valve clearances or every single one is out of spec. The smallest feeler gauge I have is .004" and I can't get it in between any of the shims and the lobes. No matter the position of the lobe. I checked in multiple positions in case I wasn't doing it right. But I'm still not sure I'm right. It just seems strange to me that all 8 would be too tight. I ordered the tool to change shims which should be here tomorrow, but I don't have any idea what shims I'll need yet.

Also, I'm not sure about timing, because the cam lobe positions don't match those in the write up. However, that is for an 850, and I can't seem to find the information on timing in the manual for the 1000 in the manual posted on that site. I'm still scouring, but there is 476 pages to skim through.
 
You need a better feeler gauge, one that will go as small as .0015". Your settings could be at .002 and be good but your feeler gauge won't let you know that they are ok.
 
I believe that valve wear generally tightens up the clearances kind of opposite of what you might think when thinking of "wear" . A feeler gauge that gets within specs is required for sure. You got the right idea, just need the right tool imho.
 
I'll go looking for one tomorrow I guess. That was the smallest one I could find looking at a couple tool shops
 
Well, I found a feeler gauge that went down to .0015. Unfortunately, that was the smallest I could find one and had to run all around town to get it. I just came back and checked clearances again. If someone could, please confirm my method so that I know I'm doing it right, and the results are correct. If I'm doing it incorrectly, please, explain or point me to a video that will show me what I need to be doing.

To check cylinder #1, rotate the motor to where the exhaust cam lobe is pointing towards the exhaust, level with the head, and the intake cam lobe is pointing backwards toward the intake, also level with the head. I then stick my feeler gauge in between the cam lobe and the shim.

To check cylinder #2,#3 and #4, I repeat the process, each time rotating the motor so that the lobes for each cylinder are facing forward and backward.

Assuming that is correct, I am still slightly screwed. Here are my measurements.

Cylinder #1
Intake - .0015
Exhaust - less than .0015

Cylinder #2
Intake - less than .0015
Exhaust - .002

Cylinder #3
Intake - .0015
Exhaust - less than .0015

Cylinder #4
Intake - less than .0015
Exhaust - less than .0015

So, obviously it is running way too tight. Every single one will need to be replaced. I think my trouble will be finding out what the ones are that are tighter than the .0015 feeler gauge I have. I guess when the tool gets here, I could pull the shims out of all of them, see what sizes are in there and try shuffling them around to see what I need? Or is there a better way to go about it?

Also, is there a way to rotate the bucket so that the notch in it is up so that shims would be easier to pop out?
 
I guess when the tool gets here, I could pull the shims out of all of them, see what sizes are in there and try shuffling them around to see what I need? Or is there a better way to go about it?
That's about the size of it. You generally find you only really need one or two once you've done some swapping around.

Also, is there a way to rotate the bucket so that the notch in it is up so that shims would be easier to pop out?
They will rotate easily when the lobe is up and away from them. If they're not, they might simply be a bit rotationally sticky with lack of use, but shouldn't be all that tight. If they're moving up and down, they're not stuck, but a slight reluctance to turn isn't uncommon on engines that have sat for years. A slight nudge with the end of a screwdriver will turn them.
 
Just remember to not rotate the engine without something in place of the shim. A quarter fits in place of a shim.
 
I'm extremely glad you mentioned that. As obvious as that is, I imagine I would have completely forgotten about that, and quickly screwed things up.
 
Well, I found a feeler gauge that went down to .0015. Unfortunately, that was the smallest I could find one and had to run all around town to get it. I just came back and checked clearances again. If someone could, please confirm my method so that I know I'm doing it right, and the results are correct. If I'm doing it incorrectly, please, explain or point me to a video that will show me what I need to be doing.

To check cylinder #1, rotate the motor to where the exhaust cam lobe is pointing towards the exhaust, level with the head, and the intake cam lobe is pointing backwards toward the intake, also level with the head. I then stick my feeler gauge in between the cam lobe and the shim.
To check cylinder #2,#3 and #4, I repeat the process, each time rotating the motor so that the lobes for each cylinder are facing forward and backward.

Assuming that is correct, I am still slightly screwed.

Your method is not correct. According to the OEM service manual (look on BassCliff page to download manual) you measure either exhaust or intake of two adjacent cylinders at the same time when the cam has been turned to the proper orientation, and not exhaust and intake of the same cylinder.

Turn motor so that the #1 exhaust cam lobe points forward and parallel with the top of the head. This is the position to check the exhaust clearances for cylinders 1 and 2.

Once you've checked exhaust #1 and #2, turn the motor so that the #1 intake cam lobe is pointing straight up, perpendicular to the head. Check clearances for intake #1 and #2.

Now on to #3 and #4. Turn the motor so that the #4 exhaust cam lobe is parallel to the head, pointing forward. Check clearances for #3 and #4 exhaust.

Next, turn the motor so that the #4 intake cam lobe is pointing straight up, perpendicular to the head. Check intake clearances for #3 and #4.
 
Last edited:
Your method is not correct. According to the OEM service manual (look on BassCliff page to download manual) you measure either exhaust or intake of two adjacent cylinders at the same time when the cam has been turned to the proper orientation, and not exhaust and intake of the same cylinder.

Turn motor so that the #1 exhaust cam lobe points forward and parallel with the top of the head. This is the position to check the exhaust clearances for cylinders 1 and 2.

Once you've checked exhaust #1 and #2, turn the motor so that the #1 intake cam lobe is pointing straight up, perpendicular to the head. Check clearances for intake #1 and #2.

Now on to #3 and #4. Turn the motor so that the #4 exhaust cam lobe is parallel to the head, pointing forward. Check clearances for #3 and #4 exhaust.

Next, turn the motor so that the #4 intake cam lobe is pointing straight up, perpendicular to the head. Check intake clearances for #3 and #4.

Thank you for clearing that up! I downloaded the manual from the site, but since it is 476 pages in image form, I wasn't able to search it for any related terms like I would a PDF. I tried going through the index and looking, but I can't find any reference of valves or timing. Call me a product of my generation I guess, not able to use a regular book correctly.

I will re check the clearances again tomorrow. Hopefully that tool will be in then too. It was supposed to be here Wednesday, but I guess the seller didn't feel like getting it out on time.

I started pulling the carbs apart to clean this evening, but stopped about halfway in, because I have poor lighting in my garage and need the sun to help. I'm trying to do some research on jet sizes now, and see what I've got in there compared to stock. The previous owner obviously didn't clean the carbs correctly though, so I'm glad I'm pulling them apart and doing it right.
 
What you are missing is the as yet unrecognized truth. Once you've gotten this thing sorted, you will know a whole lot about GS Suzukis, you will learn to appreciate the masterpieces, and will catch the bug and start shopping. Happens to all of us.
 
I'm not a lover or a hater of any brand, but I will say, I prefer my crotch rockets for going fast and my Harley's for cruising along. If it has to be carbureted, I'd like a single carb. That is the only thing that really drives me away from owning more of these old bikes myself.

I haven't made any progress in the last couple days. Had to help a couple people move. Back at it tomorrow I hope.
 
Back
Top