• Required reading for all forum users!!!

    Welcome!
    Register to access the full functionality of the GSResources forum. Until you register and activate your account you will not have full forum access, nor will you be able to post or reply to messages.

    A note to new registrants...
    All new forum registrations must be activated via email before you have full access to the forum.

    A Special Note about Email accounts!
    DO NOT SIGN UP USING hotmail, outlook, gmx, sbcglobal, att, bellsouth or email.com. They delete our forum signup emails.

    A note to old forum members...
    I receive numerous requests from people who can no longer log in because their accounts were deleted. As mentioned in the forum FAQ, user accounts are deleted if you haven't logged in for the past 6 months. If you can't log in, then create a new forum account. If you don't get an error message, then check your email account for an activation message. If you get a message stating that the email address is already in use, then your account still exists so follow the instructions in the forum FAQ for resetting your password.

    Have you forgotten your password or have a new email address? Then read the forum FAQ for details on how to reset it.

    Any email requests for "can't log in anymore" problems or "lost my password" problems will be deleted. Read the forum FAQ and follow the instructions there - that's what we have one for...

  • Returning Visitors

    If you are a returning visitor who never received your confirmation email, then odds are your email provider is blockinig emails from our server. The only thing that can be done to get around this is you will have to try creating another forum account using an email address from another domain.

    If you are a returning visitor to the forum and can't log in using your old forum name and password but used to be able to then chances are your account is deleted. Purges of the databases are done regularly. You will have to create a new forum account and you should be all set.

Painting my 450

  • Thread starter Thread starter Guest
  • Start date Start date
Pete, I should have jumped in sooner, the best way to get the ratio of hardener to filler is a golf ball sized piece of filler and a pea sized piece of hardener-every apprentice gets told this when they start body work here, spraying is the perfect way to become a master criminal-after a few jobs like yours you have no finger prints,remember the trick I told you about with the rattle cans? one of the first jobs I was given was rub all the spatter off the entire bodyshell of an estate car-by hand with wet and dry 600 grit (it took me 4 days of 8-5 to finish it) so yeah I get the so over sanding comment :0.keep it up you are getting there,oh take the tape over the end of the tank, make sure it is stuck down and spray just a little bit into the underside at both ends that way it won't blow out over the main maroon on either side of the tape.Johnny

All good Johnny, does me good to learn some of these things for myself too :)

After hearing about that estate car... guess I got nothing to complain about hey? haha that sounds painful!

Cool on the tape, although that tape there is the reverse of how I'll be masking. I just laid those lines down to work out the proper locations for the stripes so I can make the templates up. I still have to do a template for the front of the tank and the top rear of the tank to make sure I don't lay the lines crooked going over the end there.
 
That's looking good, Pete.
It should come out pretty flash.

Cheers Leigh, I hope so!

If all goes to plan I should know by about 2 or 3 this avo... although I probably won't get back on here until tonight as usual...
 
I win! (I think)

I win! (I think)


It's not perfect, but I believe it's now in fit shape for the high build primer. There's nothing left there that makes me think I need more filler and another sand so I'm definitely happy with that :D

If you look closely you'll see the sides aren't perfectly symmetrical either, but that adds character right? Not that I can do much about that without actually starting from scratch again...

I got to use the finishing sander today which made that soooooooooo much easier.

Anyway, decided to pick up a proper gun stand today which will make things easier in particular with the strainer holder:


I also grabbed some 18mm masking tape given that the stripes will be 22mm apart and so the 25mm will be too wide and I also got some rope for hanging the bits while painting. I had some here but not sure what happened to it:


I gave the garage as good a sweep out as I can today but there's still body filler dust all over the shop. Definitely have some more cleaning to do before getting the primer on on Monday.

The most frustrating part of that is I left the sheet off the bike I've had over it while sanding today, so it's now covered in the body filler dust too... :mad:
 
So seeing as sanding and trying to clean up took what time I had left this avo, I didn't get to start on the "booth" until tonight, but I did get some of it sorted.

The most important thing in my garage is that there is some lattice and open brickwork that lets dust and wind in, and I really want to cut as much of that out as possible.

The house mate brought me home some cardboard yesterday so I covered both of those up tonight:


Here's one of the flood lights I'll be using, and I got a second one today as well. It's actually a bit better than how this photo shows and with two it should be pretty good light I think:


And I got the sides of the "booth" hung up tonight, which is basically just two plastic drop sheets so far:


Obviously I have to do a floor and ceiling yet and I have another couple of drop sheets there for that. I won't be able to do the ceiling until the house mate's back on Sunday so he can give me a hand as that will be a little difficult by myself.

On another note, I sent the water separator back on Tuesday as it was faulty and I haven't heard back from them yet, so I have a feeling I'm going to have to go and pay more to buy another one locally. If they express post it back tomorrow I *might* get it Monday, but I wouldn't count on it, especially seeing as my R/R has been sitting in the post office since the 29th September and once again they didn't put a card in our PO Box to tell us it was there...
 
Well no water separator in the mail today, so expecting to have to duck out on Monday and buy another one dammit... although they're predicting thundery rain (whatever that is) so I may not get the primer on yet...

Anyway, not progress as such tonight, but a bit more prep. type stuff out of the way, I got the lights positioned.


And it seems to light the area up quite nicely:


Hopefully they're far apart enough that walking in there won't cast a shadow over the bits I'm painting...
 
Hmmmm just checked the weather forecast for this week...

Monday: Shower, possible storm. Min 15 Max 27
Tuesday: Fine. Min 13 Max 26
Wednesday: Mostly fine, possible shower. Min 13 Max 25
Thursday: Showers. Min 14 Max 25
Friday: Showers. Min 16 Max 22

As long as it doesn't actually storm on Monday or it at least storms late in the avo' I think I'll be ok, but it looks like I won't have that day leeway to start on Tuesday and finish on Thursday...
 
Your tail section looks waaayy better, Pete, but, as much as I know you don't wanna put any more body filler on it, it might save you time in the long run to put on one more thin skim coat over the remaining low spots, especially on the left side. Those low spots will be difficult to fill even with high-fill primer, or, it will take a LOT, and that's expensive stuff. A thin coat to finish it would save you the time and $$. Just sayin'...:-\\\
 
Your tail section looks waaayy better, Pete, but, as much as I know you don't wanna put any more body filler on it, it might save you time in the long run to put on one more thin skim coat over the remaining low spots, especially on the left side. Those low spots will be difficult to fill even with high-fill primer, or, it will take a LOT, and that's expensive stuff. A thin coat to finish it would save you the time and $$. Just sayin'...:-\\\

Thanks Larry, and I reeeeeeally don't want to say this... but you're right again dammit! ;)

Just went and had another peak now that I have some good lighting in the garage, and yes it definitely should get another thin coat, and this time I will hand sand only with the 120 grit as well.

I also just noticed a tiny hole on the right side in the bottom rear corner where some of the fibreglass has been exposed. You can just barely make it out in this photo:

IMG_3575-1.jpg


Just realised I completely neglected to get myself some wax and grease remover so I'll have to get back up to the auto shop and get that and some more filler. I wasted too much of it when doing the first couple of coats. I think this time I'll use their lightweight filler though as it apparently gives a smoother finish.
 
I can guarantee you'll be happy you did, Pete. Those small pin holes and low spots will come back to haunt you if you don't. Nothing worse than getting to the color stage and see those spots show through..in fact they'll scream at you they'll be so obvious. You want that filler to be smooth as you can get it before you prime it.
 
I can guarantee you'll be happy you did, Pete. Those small pin holes and low spots will come back to haunt you if you don't. Nothing worse than getting to the color stage and see those spots show through..in fact they'll scream at you they'll be so obvious. You want that filler to be smooth as you can get it before you prime it.

That makes sense... I thought the filler would be enough for those but considering I've never used it before I'm best off being safe and doing another layer :)
 
Good man. You'll be amazed at the difference. The lower edge will look better too if you take your block and do a final sand on it just to clean it up evenly. Sorry if I'm sounding like a task-master, but I just know it'll look sooo much better with those little touches. The extra effort really pays off in the long run and it'll be something to be really proud of.

One of the best compliments I ever got was when I had my '68 Corvette in a show and a really knowledgeable custom bodyman/painter told me it looked like the (fiberglass) car was made out of steel it was so straight. That's always stuck with me, even when I get so SICK of block sanding I want to kill myself..ha!

sunset-2-3_4rr-field.jpg


vette-reborn.jpg

Larry, feel free to task-master away :D

I look at it this way... how am I going to feel if in just over a week's time (when I should be sanding and polishing the clear coat after curing for three or four days) if I look at that tail piece and think... man I wish I had've done one more layer of body filler... I don't want that to happen!

I appreciate you pointing this stuff out to me and passing on your advice, otherwise if I did it purely off my own bat I'd probably regret it and have to start the tail piece all over again...

And that 'vette... that's all fibreglass? Man you must have some serious patience! That thing is smoooooooth... not surprised you got such a good compliment!

And slightly off topic... if we end up having some light sporadic showers this week (as opposed to rain) when I should be painting, is that a gun down and stop situation or is that tolerable? I've brushed the POR 15 Blackcote once in that situation as I was getting close to the 24 hour re-coat time limit and that was ok, but this is a whole world of difference with the 2K stuff.

The reason I ask is due to that weather forecast I posted earlier...

I'm hoping it's a non-event but best check...
 
I'm glad you feel that way, Pete. I didn't want to be intrusive or bossy. As far as the rain situation, as long as the humidity is less than about 75% you could take a chance and spray, but if it's 100%, then no. Humidity kills paint..badly. It never quite hardens. Better safe than sorry, even if you have to wait, unfortunately.

Thanks for the compliment on the Corvette. Talk about being sick of sanding. I worked 5 days a week for 3 years to take that car from this....

1-1.jpg


wreckedvette.jpg


A kid pulled out right in front of me back in '06 and I T-boned him at about 40mph..I just about came unglued. He had great insurance, though, and I got a pile of money to fix it, so I was able to re-do the whole car bumper-bumper. There were times I just wanted to give up, too..it was a totally exhausting restore, but I've had the car for 36 years so it was hard to let it go. Ironically, I never could've taken it to that level, if, I hadn't wrecked it.
 
Larry thats the saddest picture of a vette i have ever seen...short of one on fire.

I know, it has almost a "sad face" look to it in the 2nd pic, that's why I took it at that angle..eyeball hangin' down.. Poor baby..:( 
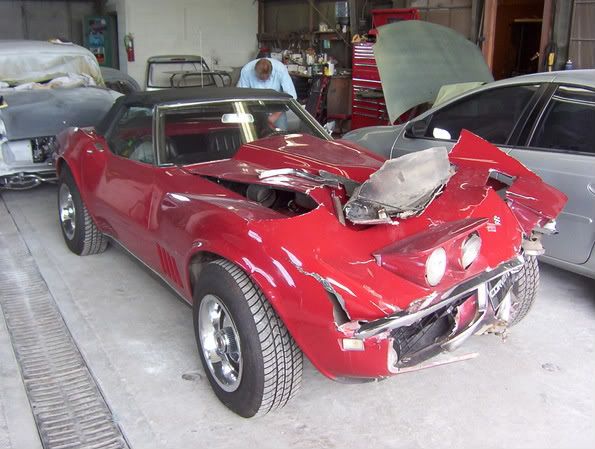
The good news was that it was structurally sound. No frame or suspension damage at all. The fiberglass folded like an accordion, though. The headlight assemblies cost $1,000 alone..ouch. 27K total in the restoration. I could've just bought another real nice one for that and saved the time and effort, but it has sentimental value to me. We've been through a lot together.
 
With filler I always remember.... Golf ball & a Pea. That's the correct ratio - try it & see :)
 
Wow Larry that's... wow... such a shame, but with such a good outcome!

I do understand the sentimental value though, and that's actually why I'm doing my 450 up. There was a point when it was pretty much all I had and she never let me down then, so time for her to get a facelift and get back on the road...

You did well to keep your patience and keep at it for 3 years, and I'm sure now you see it was worthwhile and completely worth the pain :)

About next February will be 10 years since I've ridden my 450, so I'm keen to get her finished this year if I can. I was hoping this month for her 30th birthday but I don't think I'll quite make that...

With filler I always remember.... Golf ball & a Pea. That's the correct ratio - try it & see :)

Will be doing that this time Dan! Johnny Drummond mentioned that one earlier and I wish I had've known sooner, but at least I'll have a chance to try it soon!

Oh, and I'm not doing anything at all this evening and I'll be hitting the hay very soon. Beer and sparkling red wine = no bike work, which is actually a good thing otherwise who knows what I might end up with! :eek:
 
Back
Top