-
Required reading for all forum users!!!
Welcome!
Register to access the full functionality of the GSResources forum. Until you register and activate your account you will not have full forum access, nor will you be able to post or reply to messages.A note to new registrants...
All new forum registrations must be activated via email before you have full access to the forum.A Special Note about Email accounts!
DO NOT SIGN UP USING hotmail, outlook, gmx, sbcglobal, att, bellsouth or email.com. They delete our forum signup emails.A note to old forum members...
I receive numerous requests from people who can no longer log in because their accounts were deleted. As mentioned in the forum FAQ, user accounts are deleted if you haven't logged in for the past 6 months. If you can't log in, then create a new forum account. If you don't get an error message, then check your email account for an activation message. If you get a message stating that the email address is already in use, then your account still exists so follow the instructions in the forum FAQ for resetting your password.Have you forgotten your password or have a new email address? Then read the forum FAQ for details on how to reset it.
Any email requests for "can't log in anymore" problems or "lost my password" problems will be deleted. Read the forum FAQ and follow the instructions there - that's what we have one for...
-
Returning Visitors
If you are a returning visitor who never received your confirmation email, then odds are your email provider is blockinig emails from our server. The only thing that can be done to get around this is you will have to try creating another forum account using an email address from another domain.
If you are a returning visitor to the forum and can't log in using your old forum name and password but used to be able to then chances are your account is deleted. Purges of the databases are done regularly. You will have to create a new forum account and you should be all set.
You should upgrade or use an alternative browser.
tube or tubeless tyres for 1980 Suzuki's?
- Thread starter ukjules
- Start date
Gonna jump on Jules’ thread here because I’m planning to take the tube out of my front tire over winter. Front had a tube in when I got it 15 years ago. At each new tire change, my tire guy recommended continuing to use a tube. Said there was corrosion of the aluminum around the bead area. But said that I could probably run tubeless if I cleaned up the corrosion.
Running Shinko 705, rear is tubeless, on my second rear due to a puncture and having to ride home on/ruining the tire. I now have plug kit and portable compressor and I know how to use them.
Plug kit won’t do me any good with an tube in the front though. And even with tire irons/other proper tools to remove a tire on the road/trail side, tube repair kit, etc., I just don’t want to even entertain the idea.
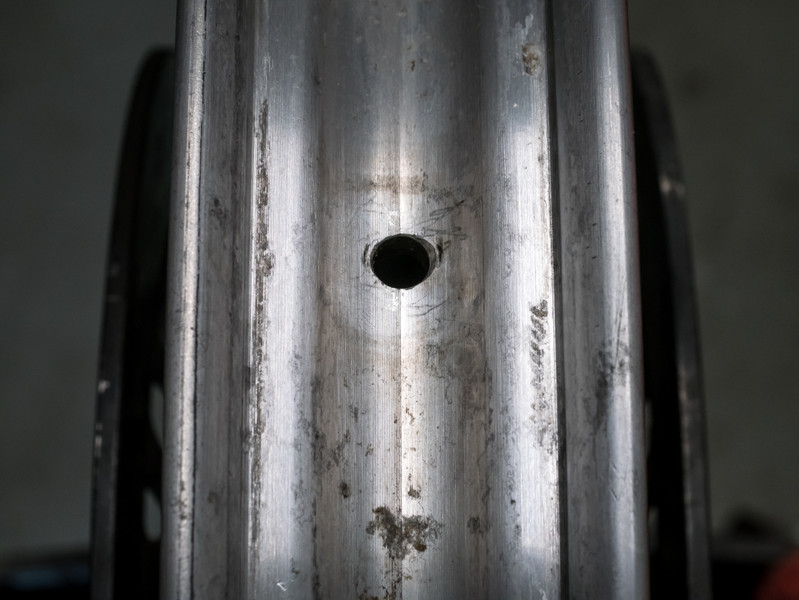
So this is what the stem looks like in front wheel.

Assuming no PO bored the hole larger, Once I get the tire/tube off, I need to a replace it with a new one. I see Brian’s pic above and that’s helpful. Been doing some shopping and getting confused by some numbers. What am I looking for? Specific links would really help. Here’s a pair on Amazon, 90deg. Because why not, I’d put the other on the rear next tire change. Will these stems work on my bike, assuming the stem holes are original?
here’s the TUBELESS embossed on the wheel.

Get these ones instead - same hole as the standard hole, but it would be a good idea to cut the rebate recess.
https://www.amazon.com/Uxcell-a1607...beless+motorcycle+valve&qid=1607823344&sr=8-8
Dave, not too sure about the valve stem set you linked. But the description was.....entertaining:
”[FONT="]Made from rubber and aluminum alloy material, these tire valve are useful for pumping your tire. Ideally for bicycle, auto car, motocycle, truck, etc.The tubeless valves can prevent unsafe factors effectively which caused by vacuum valves puncture rollover. They are the essential supplies for your driving.With thread end, you can snap it easily. And pump your tire through the cap hole conveniently.Note: please pay attention to the dimensions before ordering to make sure the caps fit your vehicle.”[/FONT]
I'm scratching my head, trying to remember a rubber valve stem on a motorcycle wheel. Probably there, I just don't remember them.
I must be crazy because I have been running tubeless for years with rubber valve stems.
Not crazy oh yes, I have them on one bike. Preferred, by me I think. The ones to fit and with shorter stems? that I wanted, seemed harder to find than the threaded types...but I think this might be because they were to out of stock where I shop at fortnine.ca .
Said there was corrosion of the aluminum around the bead area. But said that I could probably run tubeless if I cleaned up the corrosion.
@Rich82GS750TZ, just an idea as told to me by a motorcycle mechanic: "painting the rims (where corroded badly on bead surfaces) can smooth them"...MY italics and now I will tell you, having actually tried it , it had better be an epoxy or some kind of super-urethnane on a primer, because if it doesn't stick, you're going to want to clean it off again.
But ...might be something for you to investigate if you are determined for tubeless and a first try won't seal to a corroded rim...
Guest
Guest
Just did my front last year...
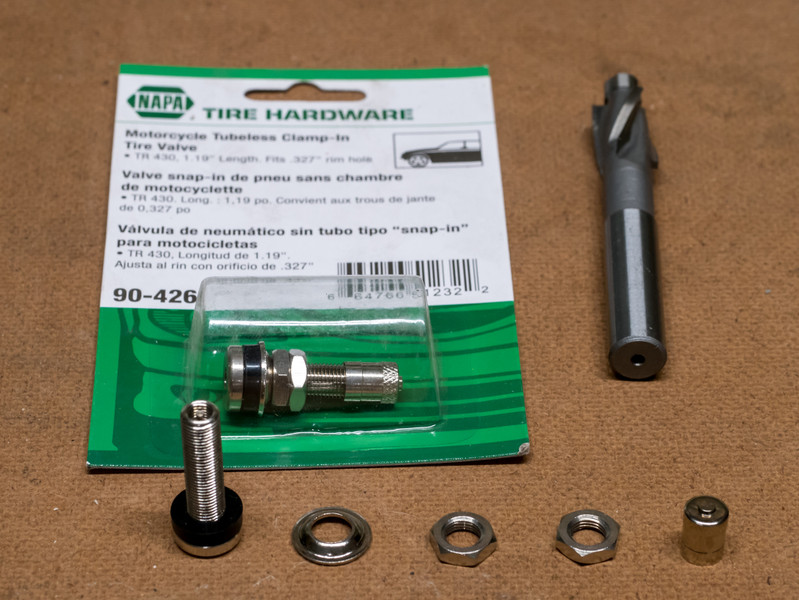
Here is the NAPA valve stem I bought. 90-426
Also the tool I found on Amazon to modify the rim. (mine did not say "tubeless")
Before modification...
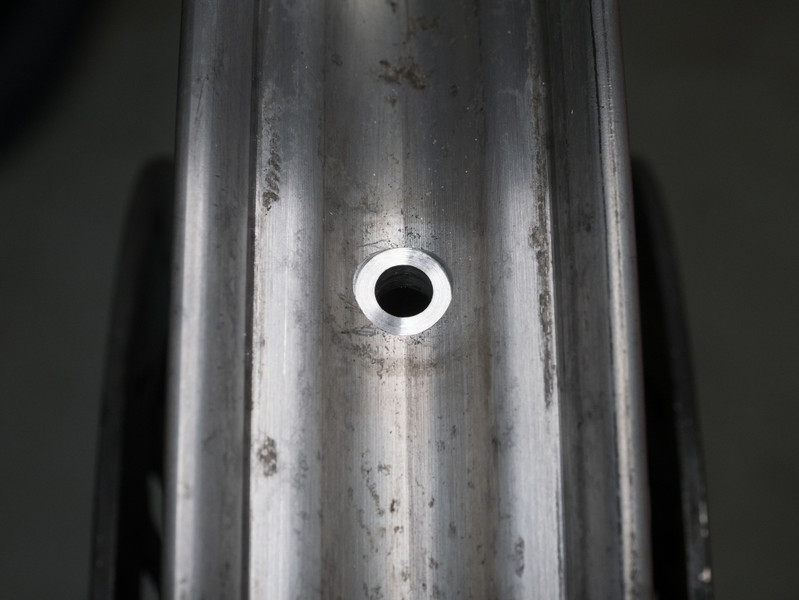
And after...
Do you have a link for the rim modification tool or a way or name to search for it? Looks like a good one to own.
https://www.amazon.com/gp/product/B01I5PFQZU/ref=ppx_yo_dt_b_asin_title_o09_s00?ie=UTF8&psc=1Do you have a link for the rim modification tool or a way or name to search for it? Looks like a good one to own.
This is a relatively cheap tool, but it works fine on aluminum. I would send you mine, but I already passed it on to another member.
If I remember correctly, the pilot (center) of the tool was a very tight fit in the hole, and I did make it slightly larger.
Guest
Guest
I use a 5/8" counterbore with a 5/16" pilot to machine the flat valve seat. It takes maybe five seconds in a cordless drill.
I ordered these several years ago from an aviation tool supplier.
Looks like they have good used ones in stock cheap right now:
https://www.yardstore.com/counterbore-spotfacer-5-8-x-1-8-used
https://www.yardstore.com/counterbore-pilot-5-16-x-1-8
I paid a bit more for new stuff, but one could set oneself up for wheel conversion pretty cheap this way.
Corrosion is not terrible I think. These Dremel bits make short work of it, but they wear quickly and I’m out. Ordering more. I’ve got about half the wheel done and I’m fairly confident I can make it acceptable.


You can see the part I’ve done on the right, still yucky on the left. Yes I put a few dings in the edge of the rim with the tire irons when I didn’t have something there to protect the rim.
 Live and learn.
I have questions about bead sealant/paste, goes by other descriptions as well. Do I need this? If so, what to use. I realize there will be differing experiences and opinions.
A 5/16" would have been better, as that is closer to the correct size of 8mm, but I couldn't find a cheap one...(LOL...At the GSR stereotype).Great pictures, Bob!
I use a 5/8" counterbore with a 5/16" pilot to machine the flat valve seat. It takes maybe five seconds in a cordless drill.
I ordered these several years ago from an aviation tool supplier.
Looks like they have good used ones in stock cheap right now:
https://www.yardstore.com/counterbore-spotfacer-5-8-x-1-8-used
https://www.yardstore.com/counterbore-pilot-5-16-x-1-8
I paid a bit more for new stuff, but one could set oneself up for wheel conversion pretty cheap this way.
The counterbore I linked had a 9mm pilot, which worked fine, but I needed to clearance the hole a bit.
Recently I bought a tub of pukka tyre soap, with freebie brush. The 5kg tub will last me a lifetime. It certainly makes things quicker and easier.
To clean up the last really grungy rim, it was so bad I had to put a 3" cup wire brush on an angle grinder and attack it all the way around. Luckily, there was no pitting or anything seriously wrong, it was just sticky, manky grungy gunge.
ukjules
Forum Sage
Can I ask a dumb a&% question for the
lesser tech people on site:
- when we say modify the rim we mean
simply changing with a drill bit the valve
area (making is flat to recieve the valve)
Not really making the hole bigger.
It is simply making the hole surround flat for a good seal
of the valve.
-and that in no way changes the profile I.e. the
small bump in proper tubeless rims . see pic.

-and why buy a valve as they have throw away ones
in any ture shop that they change on each new tyre?
[I'll ask my other question later .... re how
on earth can you manually get the tyre off ?
I ended up shouting at the devil on my hands and knees
dribbling trying to get a ride on mower ture off)
ukjules
Forum Sage

I'm scratching my head, trying to remember a rubber valve stem on a motorcycle wheel. Probably there, I just don't remember them.
Rubber valve stems are standard on almost all modern motorcycles with tubeless tires. The correct size is usually 412, the shortest style. 413 valve stems work fine and are much easier to find; they're just 1/4" longer. I keep 412 stems on hand because they must be replaced when the tires are replaced.
FWIW, I would avoid the common practice of installing aluminum right angle valves... they look nice, but they're quite fragile, and the o-ring seals are not very reliable. Rubber valve stems are resilient and pretty much bulletproof.
Woho this gets more interesting..
Can I ask a dumb a&% question for the
lesser tech people on site:
- when we say modify the rim we mean
simply changing with a drill bit the valve
area (making is flat to recieve the valve)
Not really making the hole bigger.
It is simply making the hole surround flat for a good seal
of the valve.
-and that in no way changes the profile I.e. the
small bump in proper tubeless rims . see pic.
View attachment 62082
-and why buy a valve as they have throw away ones
in any ture shop that they change on each new tyre?
[I'll ask my other question later .... re how
on earth can you manually get the tyre off ?
I ended up shouting at the devil on my hands and knees
dribbling trying to get a ride on mower ture off)
Correct; as in Bob's pictures above, some vintage cast wheels manufactured before tubeless tires were common are curved on the inside. You need a flat surface on the inside of the wheel so that the rubber sealing washer can seat. The wheel should not be modified in any other way.
Do NOT make the hole bigger; the idea is to cut just enough to make a flat area. (And if the surface is already flat, as in some rear wheels, you don't need to do anything; you don't need to make a recess.)
The flat area needs to be 16mm (which is almost exactly 5/8") and the valve stem hole is a little over 8mm (almost exactly 5/16").
Also, FWIW, your photos are showing spoked wheels which are made from extrusions and cannot be converted to tubeless use; we are discussing cast wheels here.
(Yes, there are people who are experimenting with adhesive sealers to seal spoked wheels; this is not what we are discussing and success is spotty at best.)
The rubber valve stems used on most modern bikes use a much larger hole. I don't think it's a good idea to drill the hole larger in vintage wheels.
Also, when installing a metal valve stem, be very careful about how much you compress the rubber sealing washer. It should be compressed by about 1/3, not squashed until it splits.
I replace metal valve stems every five years; that's about the limit of how long you should trust the rubber washer. I suppose you could just replace the rubber washers, but I've never bothered.
As I mentioned above, rubber valve stems on modern bikes always get replaced along with the tires.
And then there are a few modern bikes with TPMS, which is a whole 'nuther ball ache; you mainly just have to be aware there's a sensor in there and work around it. The seals in these should be changed with every tire change.
Changing tires is a skill like any other, and you get better at it with experience. If you're having trouble or getting frustrated, STOP what you're doing and THINK before you damage a wheel or tire. 99% of the time, you're not managing the other side of the tire correctly; the bead MUST be down into the center of the wheel.
You don't need an expensive, bulky machine. After some experience, you can change a tire nearly as fast or faster with tire irons and a simple stand. I was considering a No-Mar, but using one did not impress me in the least, and the urge quickly faded.
Tires on small diameter wheels as on garden tractors are the most challenging by far. Larger diameter tires, as on a GS front wheel, are the easiest of all; just a big bicycle tire.
Close... the first is the wrong diameter. You need 16mm (or 5/8").
The second is just the counterbore. You'll also need the pilot that goes into the 1/8" (3.2-is mm) hole in the counterbore. The pilot will need to be one with a 1/8"/3.2mm shaft and a 5/16" (8mm) nose.
You can use a lot of things to ease the tyre on - for years I used hand soap. Don't use dish soap, as the common thickener in that is salt; very bad for the rim.
Recently I bought a tub of pukka tyre soap, with freebie brush. The 5kg tub will last me a lifetime. It certainly makes things quicker and easier.
To clean up the last really grungy rim, it was so bad I had to put a 3" cup wire brush on an angle grinder and attack it all the way around. Luckily, there was no pitting or anything seriously wrong, it was just sticky, manky grungy gunge.
Agreed; I've dealt with the damage dish detergent does to wheels many times and it is not pretty or pleasant. It's extremely corrosive stuff. Even on modern bikes with powder coated wheels, detergent can attack via a tiny scratch.
A jug of real tire mounting lubricant costs very little, works wonderfully, and will last most riders for many years. (In the USA, RuGlyde from Napa is the most widely available.) There's no reason at all to fart around with homemade concoctions or other inappropriate substitutes (Windex, WD-40, silicone spray, furniture polish, etc.), but for some reason this practice is very common.
If you're really in a pinch, a very weak solution of the mildest, simplest soap you can find (NEVER a detergent like shampoo) can work, but it won't have the anti-corrosion additives found in real tire mounting lubricant. Murphy's oil soap is fairly common in the US (and Murphy's does make a version of their soap specifically for mounting tires), and some mild hand soaps or saddle soaps can work as well.
One of the biggest reasons for learning to mount your own motorcycle tires is that you can take the time to clean up the sealing surfaces; shops never, ever do this. When I started doing my own tires, I noticed a huge difference in the rate of pressure loss. I thought it was normal to lose 4 or 5 psi in a week.
I would say to use the least damaging method possible to clean up the wheels. A wire brush is pretty drastic, but once in a while it's necessary. I usually scrub with WD-40 soaked into a rough cloth or perhaps a piece of dish sponge or teflon-safe scotch-brite.
Out of a desire to do as much of my own work as possible on my bike, I decided to attempt to remove the tire myself using tire irons, sweat, a yes, a lot of swearing. I've always had a local small motorcycle shop do my tire changes. I'm glad I did it. I was looking for a 90 deg. valve but can't find one for the stem hole size, and I wanted something a little better that what the shop would put in. I didn't go to my normal shop for a valve because, well, as great as the guy is with bikes, and I've never complained about all the things I've had him do (rebuilt my carbs perfectly and cheap), he can be kind of a jerk, so I avoid him if possible. The local chain tire shop in my town is dead to me after a botched alignment job on my MINI.
I found the same or very nearly the same valves on Amazon that Bob posted above from NAPA. I'm probably overthinking all of it, like I usually do. But I do not want to drill the hole larger. We'll see how it goes. I have a few days off over the next few weeks, so I have some time to work on it. Not in a hurry. Too cold and wet right now, and an impending big snow storm on the way later in the week.
Am I right, that the normal rubber 412 or 413 stem will not work in the hole in my rim?
The hole mics at .328” (8.35mm). The recess in the underside .571” (14.5mm)