-
Required reading for all forum users!!!
Welcome!
Register to access the full functionality of the GSResources forum. Until you register and activate your account you will not have full forum access, nor will you be able to post or reply to messages.A note to new registrants...
All new forum registrations must be activated via email before you have full access to the forum.A Special Note about Email accounts!
DO NOT SIGN UP USING hotmail, outlook, gmx, sbcglobal, att, bellsouth or email.com. They delete our forum signup emails.A note to old forum members...
I receive numerous requests from people who can no longer log in because their accounts were deleted. As mentioned in the forum FAQ, user accounts are deleted if you haven't logged in for the past 6 months. If you can't log in, then create a new forum account. If you don't get an error message, then check your email account for an activation message. If you get a message stating that the email address is already in use, then your account still exists so follow the instructions in the forum FAQ for resetting your password.Have you forgotten your password or have a new email address? Then read the forum FAQ for details on how to reset it.
Any email requests for "can't log in anymore" problems or "lost my password" problems will be deleted. Read the forum FAQ and follow the instructions there - that's what we have one for...
-
Returning Visitors
If you are a returning visitor who never received your confirmation email, then odds are your email provider is blockinig emails from our server. The only thing that can be done to get around this is you will have to try creating another forum account using an email address from another domain.
If you are a returning visitor to the forum and can't log in using your old forum name and password but used to be able to then chances are your account is deleted. Purges of the databases are done regularly. You will have to create a new forum account and you should be all set.
You should upgrade or use an alternative browser.
'83 850GL Maintenance and other repairs
- Thread starter 93Bandit
- Start date

93Bandit
Forum Mentor
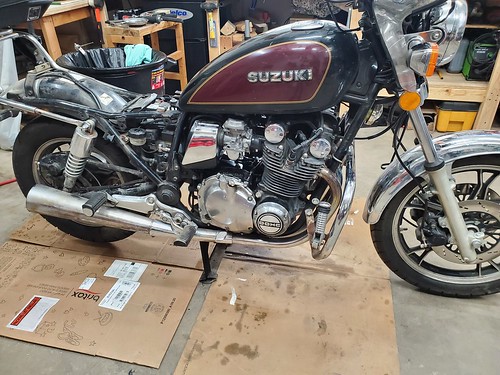
I also put a crash bar on the bike, then put my highway pegs on the crash bar. They're in a much more comfortable location now and are more firmly mounted which will be nice. I'm sure Mr. Rob S. will appreciate the crash bar! Some may recognize it as the crash bar Mr. Rob S. kindly suggested I remove from the 750 I revived. I warned him it may find its way on my 850! I think at some point I'm going to install some aux fog lamps to the crash bar as well, but I'm in no hurry.
Here's a picture of the accessories installed.

93Bandit
Forum Mentor


93Bandit
Forum Mentor
Back in the day, 2 things helped "MY" hands falling asleep. Foam grips, felt odd first ride then then all good, your fingers aren't wrapped in as tight of circle + foam eats the vibration... Vista Cruise throttle lock really helped back when smoking while riding, or any time you wanted to turn loose of the throttle.
I have heated grips on my bike, so unfortunately foam grips aren't an option unless I give up the heat. The heated grips are a life saver in the cooler months when I ride, so I'm keeping them.
As for the Vista Cruise, I actually have one. Unfortunately, due to the wide harness end of the heated grip, the ring that goes on the grip has to be too far outboard which pushes my hand so far my hand hangs off the grip. I tried to get used to it but it made the cramping worse since when holding the grip, I was only using 3 fingers instead of all 5. If the ring wasn't so wide, I could use it and would love it. Thus my DIY job.
I was of the same opinion years ago, but I discovered internal bar heaters, which allow the use of foam grips.I have heated grips on my bike, so unfortunately foam grips aren't an option unless I give up the heat. The heated grips are a life saver in the cooler months when I ride, so I'm keeping them.
Last time I looked for another set, the maker had disappeared, but similar sets are available for snowmobiles.
That's an interesting concept...I can see how that would work on the left grip, but how well does the heat conduct from the handle bar to the throttle then to.the grip? Might have to look into that
It works fine. There's a slight difference in how quickly you feel the heat, but after five minutes they're both toasty anyway.
Here's a sample set for something to look for...
https://www.remotemoto.com/articles/...otorcycle-kit/
The bar heater market seems to be flooded with rectangular heat pads, but I wonder if they can be curled up and inserted internally.
93Bandit
Forum Mentor
Now that winter has set in, I'm going to get started on the bike after the holidays. Brake lines, front brake switch, cam chain tensioner, valve adjustment, and probably a few other odds and ends. Thanks to my heated and insulated garage, bike work in the winter is cozy and fun.
Thanks to my heated and insulated garage, bike work in the winter is cozy and fun.
Yep, it makes a huge difference.
Prior winters, I'd used a simple electric oil-filled heater to get the inside temp to around 16degC and it was wonderful, when the outside temps were just around zero - we don't usually get much colder than that around here, but recently... brrr...
Anyway, with the price of electricity going sky-high this year, I've bought a Chinese Diesel Heater (Eberspacher copy) for the workshop, and should be able to heat it for half the price next winter.
93Bandit
Forum Mentor
Yep, it makes a huge difference.
Prior winters, I'd used a simple electric oil-filled heater to get the inside temp to around 16degC and it was wonderful, when the outside temps were just around zero - we don't usually get much colder than that around here, but recently... brrr...
Anyway, with the price of electricity going sky-high this year, I've bought a Chinese Diesel Heater (Eberspacher copy) for the workshop, and should be able to heat it for half the price next winter.
Interesting, hope that diesel heater works out better for you! I've got a natural gas line in the garage, T'd off the main line for my house furnace. I bought a used Modine natural gas heater and hung it from the ceiling. Wired a cheapy thermostat to it and keep the garage at 50F 24/7. When I want to work out there, I bump it up to ~65F. Fortunately my garage is insulated well enough that my monthly gas bill didn't go up too much. It's well worth the added cost to keep it heated. Keeps all the tools from freezing which is nice on the fingers.
Before you guys think I'm a softy, I've done my fair share of automotive repairs out on the driveway during a Blizzard. Now that I'm spoiled, I'm taking full advantage of it.
Admiral Beez
Forum Mentor
It works fine. There's a slight difference in how quickly you feel the heat, but after five minutes they're both toasty anyway.
Here's a sample set for something to look for...
https://www.remotemoto.com/articles/...otorcycle-kit/
The bar heater market seems to be flooded with rectangular heat pads, but I wonder if they can be curled up and inserted internally.
I'm thinking of adding heated grips to my GS650G. What brand/model did you buy?
I'm thinking of adding heated grips to my GS650G. What brand/model did you buy?
On the XJ, it's a pair of Oxford grips, but the internal ones on the GS, the maker is long gone and I haven't found a replacement set for when they eventually peg out.
I had an eye on Polly snowmobile heaters, but they seem to have stopped making the internal ones they used to advertise. Found an old-stock pair but was too late and the seller pulled them.
However, there are available some industrial core heaters, which is all they are and I'll be going down that route, since the control is nothing more than a series / parallel switch.
Admiral Beez
Forum Mentor
The ones with the external box don't interest me. My bars are already cluttered enough.On the XJ, it's a pair of Oxford grips, but the internal ones on the GS, the maker is long gone and I haven't found a replacement set for when they eventually peg out.
I had an eye on Polly snowmobile heaters, but they seem to have stopped making the internal ones they used to advertise. Found an old-stock pair but was too late and the seller pulled them.
However, there are available some industrial core heaters, which is all they are and I'll be going down that route, since the control is nothing more than a series / parallel switch.
93Bandit
Forum Mentor
Here's the bowl I collected the old fluid into. Pretty nasty, good thing I finally changed it!

Here's one of the old lines cut open. Doesn't look to bad to me, but I know they're beyond expired so good to replace and now I don't have to worry about them failing.

New front lines installed! Please pardon the dirty state of my bike. I ride some dirt roads due to where I live, and I've gotten caught in the rain. Unfortunately I'm not the best at keeping my vehicles clean. I loathe cleaning in general, so it gets neglected more than it should...

New rear line installed. I thought this line would be a major pain to replace since it is routed through a tight hole/passage through the swing arm. However, rotating as I pulled the banjo through it came right out.

Next I think I'll rebuild the cam chain tensioner. I had time today but lost the motivation to pull the tank and carbs off. Maybe tomorrow morning I'll feel spunky enough to get it done.
Pictures to follow once I sit down at my PC...
93Bandit
Forum Mentor
Anyways, with this invigorating sense of motivation, I ran to the garage before it vanished and took the tank and carbs off the bike to access the cam chain tensioner. I pulled it off and rebuilt it. I thank past-me for ordering all these parts 7 months ago in preparation. I usually order parts as needed when working through a project. See what needs replaced and make a list to order. This approach is fine, but it often delays progress. This time I ordered everything I could possibly need to do these jobs and gotter-done.
Here's the filthy dirty engine case and tensioner. It's hard to tell, but all the oil leakage on this side of the engine is from the tensioner. I soaked the engine case with degreaser while rebuilding the tensioner.

This thing is definitely leaking and in need of a rebuild.

Freshly rebuilt tensioner. It still looks dirty because I didn't repaint it, but I assure it's squeaky clean and has fresh seals. Fortunately the 30mm nut wasn't stuck so I was able to replace the large inner O ring as well. I used my solvent tank to clean this thing which is another reason I'm glad I was able to do a full tear down. I wanted to ensure all the solvent was removed from the internals before rebuilding. That solvent could damage the seals and cause lubrication issues. Pardon the cardboard sacrificial jaws on my vice. I need to get some plastic ones...

Reinstalled tensioner and cleaned engine case. I didn't get every ounce of dirt and grime off the engine, but I cleaned it as best as I could with engine degreaser, paper towels and a screwdriver. Someday if/when I pull the engine for a rebuild I'll do a more thorough job. Good enough for now.

All back together with rebuilt tensioner and new brake lines.
93Bandit
Forum Mentor
Brakes are definitely less mushy! The levers are touchy compared to how it was with the original lines. I think I got a minor performance upgrade using the Earls brake lines rather than replacing with OEM rubber lines. When I got home I double checked all the fittings for leaks and did fine the block where all 3 front lines T off each other was wet, so I snugged those banjo bolts and cleaned it off. We'll see if that did it. If not, I've got some extra compression washers to try again. All my compression fittings are dry which was my main concern!
Oil leak appears to be fixed and I got the tensioner rebuilt and installed successfully which is great. I was a little intimatintimated by it but the job was easier than I expected.
All in all, I think the work I did was a success. Still need to check the valves before too long.
93Bandit
Forum Mentor
I took the clutch plates out and measured all of them. I measured thickness at 4 spots on each plate, 12, 3, 6, & 9 oclock.
Spec per the OEM manual for the frictions is 0.106-0.114" with the limit being 0.094", and steels spec is 0.080" with no limit specified.
My clutch plates measured the following:
-The friction plates measured 0.107-0.109", most being 0.107".
-The steels measured 0.075-0.077", most being 0.077".
So my frictions fall within spec, although all are at the low end. All the steels are below spec, but only by ~0.003". None of the steel plates are scored or look worn. Only one plate has 3 areas of discoloration due to heat which you will see pictured below. Also, I dried off the frictions well and gave them a close inspection. They definitely have a shine to them so I think they are glazed. I also noticed that when wiping the oil off them the friction material was flaking pretty heavily and felt somewhat brittle in places. See pictures below.
Here's the only steel plate showing signs of overheating. It's not warped and still has a smooth even surface so I will be reusing it.

Here's a few pictures of the frictions. You can see the shinny hard surface.


Here you can see where some of the friction material flaked off.

Also, when I took the clutch plates out I noticed the basket was loose. Come to find out, the basket hub nut was very loose, the only thing holding it on was the washer. So I need to take that apart to see why it came loose. Hopefully there's nothing damaged/badly worn and I can just retorque it.

I think between the age of the clutch, the brittle friction material, all the plates measuring at the low end of spec and the glazed appearance, I am going to opt for installing new friction plates. My biggest fear is the material being so brittle, I don't want that coming apart and contaminating the engine, clogging oil passages etc.