• Required reading for all forum users!!!

    Welcome!
    Register to access the full functionality of the GSResources forum. Until you register and activate your account you will not have full forum access, nor will you be able to post or reply to messages.

    A note to new registrants...
    All new forum registrations must be activated via email before you have full access to the forum.

    A Special Note about Email accounts!
    DO NOT SIGN UP USING hotmail, outlook, gmx, sbcglobal, att, bellsouth or email.com. They delete our forum signup emails.

    A note to old forum members...
    I receive numerous requests from people who can no longer log in because their accounts were deleted. As mentioned in the forum FAQ, user accounts are deleted if you haven't logged in for the past 6 months. If you can't log in, then create a new forum account. If you don't get an error message, then check your email account for an activation message. If you get a message stating that the email address is already in use, then your account still exists so follow the instructions in the forum FAQ for resetting your password.

    Have you forgotten your password or have a new email address? Then read the forum FAQ for details on how to reset it.

    Any email requests for "can't log in anymore" problems or "lost my password" problems will be deleted. Read the forum FAQ and follow the instructions there - that's what we have one for...

  • Returning Visitors

    If you are a returning visitor who never received your confirmation email, then odds are your email provider is blockinig emails from our server. The only thing that can be done to get around this is you will have to try creating another forum account using an email address from another domain.

    If you are a returning visitor to the forum and can't log in using your old forum name and password but used to be able to then chances are your account is deleted. Purges of the databases are done regularly. You will have to create a new forum account and you should be all set.

Backfiring causes?

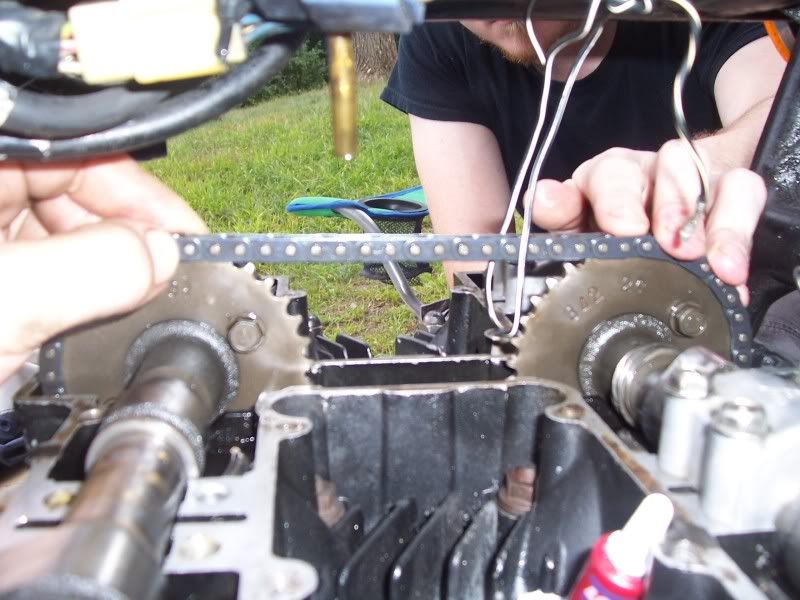
First I rotated the crankshaft so that the number 1 arrow is pointing straight ahead directly at the front gasket face, the area next to the tach drive. The T mark for cylinders 1 and 4 on the advance mechanism is lined up with the timing mark under the breaker plate (with no slack down the front of the chain between the exhaust cam sprocket and the crankshaft sprocket). If I understand correctly, this is what I want. It means the exhaust cam is properly timed. Step two, I removed the idler from the head revealing the entire top run of the cam chain. I counted the pins between the number two arrow on the exhaust cam and the number three arrow on the intake cam. Starting with the pin directly over the number two mark I counted twenty (20) pins; pint number 20 being directly over the number 3 mark on the intake cam. I counted several times, I did not miscount. According to what I understood from the manual this is exactly what I want, 20 pins means the intake cam is properly timed. The reference seems to be starting from the crankshaft, up the front of the chain to the exhaust cam, back to the intake cam. These distances must be precise; the run from the intake cam down the back of the engine to the crankshaft is taken care of by the tensioner. This is the way I bolted everything back together. Again if I did something wrong please tell me because I'd love to go out there and change the cam timing and have the bike run again.

First start by holding the front of the timing chain and rotating the crank so that the T mark on the 1-4 side aligns with the timing mark. Install the exhaust cam so that the 1 on the cam sprocket is aligned with the edge of the cylinder head. Hold the cam in that position and pull up the chain, removing the slack, engage the timing chain with the sprocket. The number 2 on the cam sprocket should be pointing straight up. The pin that is aligned with the #2 will be the first pin, count 20 pins from there. Install the intake cam so that the #3 on the intake cam is aligned with pin #20. Do not rotate the engine until the bearing caps are installed. Make sure the timing marks are still aligned. You can now install the tach gear, idler and tensioner.
 
First start by holding the front of the timing chain and rotating the crank so that the T mark on the 1-4 side aligns with the timing mark. Install the exhaust cam so that the 1 on the cam sprocket is aligned with the edge of the cylinder head. Hold the cam in that position and pull up the chain, removing the slack, engage the timing chain with the sprocket. The number 2 on the cam sprocket should be pointing straight up. The pin that is aligned with the #2 will be the first pin, count 20 pins from there. Install the intake cam so that the #3 on the intake cam is aligned with pin #20. Do not rotate the engine until the bearing caps are installed. Make sure the timing marks are still aligned. You can now install the tach gear, idler and tensioner.

But... then it would look exactly as it does now, wouldn't it? I'd be taking it apart and putting it back together in exactly the same position as I already have, wouldn't I?
 
What I am suggesting is that you remove the cams and start over. From your description, it sounds like the cams were in place when you rotated the crank. I would not have rotated the crank with the tensioner removed.

Just out of curiosity, when the timing mark is aligned with the T, where is the location of the #1 piston? Is it at the top of the stroke, bottom of the stroke, or somewhere in between. You can remove the #1 plug to see the top of the piston.
 
Do some obsevations before disassembly?

Do some obsevations before disassembly?

With just the cam and crank end covers off you can rotate the crank slowly and see when the cams open and close the valves in relation to all the timing marks and piston movements. You're looking for anomalies or nonsense in any of the movements. :confused:
Bill
 
But... then it would look exactly as it does now, wouldn't it? I'd be taking it apart and putting it back together in exactly the same position as I already have, wouldn't I?

Hey Allie, I just did this last night and I will tell you an extra set of hands is very important for this to stay where it should. The step he is trying to point out is to removed the chain from the exhaust cam and be sure to pull all the tension up the front and over the cam. It could appear to be timed but be off by a link if you missed that step. I could not snap a good picture of the top dead center mark through the view window but here is the top of mine...

100_5344.jpg


The slower you redo this process the better, also follow the steps carefully for resetting the tension. I recall after its all torqued down you turn it a few times and recheck the positions then, turn the engine counterclockwise slowly while turning the knob slowly counterclockwise on the tensioner, then release and turn the engine regular again.

Also Steve's suggestion of tapping the top of the valves to reseat them is much easier with the cams off. You would want to remove the shim and bucket and tap the valve in the center with a large wood dowel or block, if you use say a socket and hit the part around the valve in the center you would likely pop out the keepers and have to take the head off to reinstall the valves. So be sure you are hitting the actual top of the valve (center piece under the buckets)

So just for the sake of being able to really push in the valves and let the springs seat them better it might be worth repeating this procedure... and if you can get a set of hands to keep the chain tight and in positions its a HUGE help.
 
Last edited:
Well it looks as though those cams are coming off - hey I wanted to learn, I guess I got my wish. Yes it sure would be nice to be able to smack straight down on those valves. And even though nothing is visibly off with the cam timing something still has to be off, there's really no other explanation is there?

With the T mark for 1-4 aligned, by the way, pistons 1 and 4 are at TDC, 2 and 3 are at BDC (is there such a term?). I also notice the cams look quite symmetrical - the lobes on the exhaust cam point as follows: 4 straight ahead, 3 straight up, 2 straight down, 1 straight back. The intake lobes are a mirror image - 4 straight back, 3 straight down, 2 straight up, 1 straight forward. How does that sound to you engine geeks? It sure looks cool to me, and may even be a manifestation of the metaphysical underpinnings of appliantology. :eek: :-\\\

I was thinking of taking the head off for a peek while the cams are off, but maybe I'll just do the cams first and see what happens. It was probably unwise of me to even pop the valve cover while I did the intake stuff, I like doing one thing at a time and recording results much better. It may take longer but it's more thorough.
 
wish i snapped a better pick but from what I can see in mine those cam positions are roughly correct.

You can do it, I was without the GS for 2 and a half weeks but its buttoned up and fired right up tonight. Felt great to get a ride after all that work getting it going, YOU will have your ride soon just keep the wrenches turning.
 
Does the 79 have points? if the cam chain tensioner was off might be worth a look and make sure the points are opening at the right time. I'm lazy and check the easiest stuff first. That's also why I have twins instead of 4 cyl.
 
Fudge?

Fudge?

I was thinking of taking the head off for a peek while the cams are off, but maybe I'll just do the cams first and see what happens. It was probably unwise of me to even pop the valve cover while I did the intake stuff, I like doing one thing at a time and recording results much better. It may take longer but it's more thorough.
You're right, each step compounds the variables of the previous step. I'm no longer bold about rebuilds. Going forward I'll wait for good running bikes, before I buy. No more ?Learning Experiences? if I can avoid them.
Taking the head off will allow you to examine the ignition chambers, the valves from all sides, and the piston rings. I think the rings are fine. It could be you bent a valve.
However a new head gasket will be $100. You are a musician, right? :-\\\ Hope nothing has to go on Ebay.
Bill
 
Totally, start with just the cams and give the top of the valves a good hit to rebound and set. However watch the TDC marks and make sure you do 2and3 with 1-4 tdc.

Also if you did not remove the cams you would not really be able to pull the tension off the chain to set that exhaust cam. If it slipped a notch you need to remove them to reset the chain, at the very least the intake cam to get the slack.

Putting it all together after that step saves you the $150-$200 in gaskets taking a peak one level lower will cost you, so its definitely worth the time to see if that's enough to get you rolling again.
 
Thanks folks and yes it does sound like a good idea to check points again after I get compression back. I'm going to be busy today teaching and apping for a job, but the cams, shims, and buckets (Mrs. Bucket??) are out, and I'm ready to give the valves a good stout thrashing. I'll keep ya posted :D.
 
Ask steve for more details if you need, Im not highly qualified... but keep in mind the piston positions when you are giving the valves that thrashing to make sure you only do the ones with the piston at the bottom. then rotate and thrash away at the others :eek:

Got any pictures for us? could be of you, or baked goods, or even the bike if you prefer :D
 
You see me in my avatar... do I look like the kind of mechanic that would drive a valve inter her piston?? :-\\\
 
Well, I know I am... I always have to remind myself of the little things... should have told myself to gas up the GS and charge the battery before I went to work... but nope got a lesson in pushing a bike chunk of metal up a hill.

Anyways have fun:

tempdf.png
 
Last edited:
Sk8guy you slay me! Believe me I appreciate every reminder, especially about something as critical and easy to forget as 'put teh piston at teh bottom afore ya throw down on teh valve, stoopit'. The more times I see it the more times I'll remember it.
 
Ask steve for more details if you need, Im not highly qualified... but keep in mind the piston positions when you are giving the valves that thrashing to make sure you only do the ones with the piston at the bottom. then rotate and thrash away at the others :eek:

Got any pictures for us? could be of you, or baked goods, or even the bike if you prefer :D


The crime scene:

IMGP1185.jpg


The criminal:

young-frankenstein.jpg


Just kidding:

IMGP1186.jpg


Hmm the ape has better hair than both of us.
 
Yesterday afternoon after banging the valves around a little I put the cams back in, with careful attention to timing. Everything seemed to go together well, not much drama. I turned the crank a few times slowly with a wrench to make sure there was no noise or resistance, and all the valves seem to operate fine. I did a quick compression check and got pretty much the same results as from my original no oil test. Drat. I'll probably set timing again today, and check it again. If I can't get compression after I'm sure the cam timing is on, I guess I may try the 'low rent' leak down test I read about on Dan's site. Hook up about 20 psi to your compression gauge hose and listen for leakage noise from the intake ports, exhaust ports, and crank case.

Just a couple of questions; if the valves visibly operate normally and follow the cam lobes, it is unlikely that they are bent, is it not? Not to mention the valve clearances are still tight... unlikely that a valve is sticking open.

Next, is it possible that my No. 2 exhaust valve, which has a gunky looking seating surface, has been hanging open a bit and built carbon up on it, and I disturbed enough of the carbon to kill compression in that cylinder?

I may have to call the pros in for a house call yet.

Fletch-1.jpg
 
Allie wth are you doing? Ya don't take the carbs off for a rebuild/cleaning/boot replacement and magically end up with no compression in one of your cylinders...

Carbon on the seating surface of the valve could def skew your clearance readings, but you'd have to have a crap ton or a serious valve seal leak to have it build up enough to have zero comp on a cylinder. How are you testing compression if the bike can't run? It needs to be warm, tested with the throttle wide open. If I were you, I would assure you're timing is right, put the thing back together, carbs and all doing what you know how to do, and see what happens... If #2 is still a dead pot, it'll be time to pull it all down...
 
Learner's permit?

Learner's permit?

I guess I may try the 'low rent' leak down test I read about on Dan's site. Hook up about 20 psi to your compression gauge hose and listen for leakage noise from the intake ports, exhaust ports, and crank case.

Just a couple of questions; if the valves visibly operate normally and follow the cam lobes, it is unlikely that they are bent, is it not? Not to mention the valve clearances are still tight... unlikely that a valve is sticking open.

Next, is it possible that my No. 2 exhaust valve, which has a gunky looking seating surface, has been hanging open a bit and built carbon up on it, and I disturbed enough of the carbon to kill compression in that cylinder?

I may have to call the pros in for a house call yet.

Fletch-1.jpg
That Dan's got a lot of good tips. Blowing compressed air in there and listening for where it comes out makes sense.
A valve could be bent just a mite.
Just today I remembered I bent all the intake valves in a Chevy V-8 because I misunderstood the marks on the cam sprockets.
Today I'm messin' around changing the cams in my GSX750 Katana project. Lots of trial and error and I hope I didn't bend a valve myself.
I won't know for sure until I can do a comp. test.
Best of luck Allie
Bill
 
Allie wth are you doing? Ya don't take the carbs off for a rebuild/cleaning/boot replacement and magically end up with no compression in one of your cylinders...

Carbon on the seating surface of the valve could def skew your clearance readings, but you'd have to have a crap ton or a serious valve seal leak to have it build up enough to have zero comp on a cylinder. How are you testing compression if the bike can't run? It needs to be warm, tested with the throttle wide open. If I were you, I would assure you're timing is right, put the thing back together, carbs and all doing what you know how to do, and see what happens... If #2 is still a dead pot, it'll be time to pull it all down...

Well yeah no kidding... I don't think the intake work has anything to do with the dead cylinder. However, I did take all the shims out to measure them, and but them back in - and somehow ended up with a dead cylinder. I seriously doubt the cylinder was 'all dead' before I started, though I bet it was on its way... maybe it was only 'mostly dead'?

I'm well aware that a warm engine will give more accurate compression readings, but that's not an option at this point. Nor do I think a warm engine would make much difference for Cylinder #2, and I don't think the bike will run again until the cylinder is not 'all dead'. I'm trying to figure out what I did to kill that cylinder, and exhaust all my options before taking the head off. That's 'wth' I'm doing...
 
Back
Top