• Required reading for all forum users!!!

    Welcome!
    Register to access the full functionality of the GSResources forum. Until you register and activate your account you will not have full forum access, nor will you be able to post or reply to messages.

    A note to new registrants...
    All new forum registrations must be activated via email before you have full access to the forum.

    A Special Note about Email accounts!
    DO NOT SIGN UP USING hotmail, outlook, gmx, sbcglobal, att, bellsouth or email.com. They delete our forum signup emails.

    A note to old forum members...
    I receive numerous requests from people who can no longer log in because their accounts were deleted. As mentioned in the forum FAQ, user accounts are deleted if you haven't logged in for the past 6 months. If you can't log in, then create a new forum account. If you don't get an error message, then check your email account for an activation message. If you get a message stating that the email address is already in use, then your account still exists so follow the instructions in the forum FAQ for resetting your password.

    Have you forgotten your password or have a new email address? Then read the forum FAQ for details on how to reset it.

    Any email requests for "can't log in anymore" problems or "lost my password" problems will be deleted. Read the forum FAQ and follow the instructions there - that's what we have one for...

  • Returning Visitors

    If you are a returning visitor who never received your confirmation email, then odds are your email provider is blockinig emails from our server. The only thing that can be done to get around this is you will have to try creating another forum account using an email address from another domain.

    If you are a returning visitor to the forum and can't log in using your old forum name and password but used to be able to then chances are your account is deleted. Purges of the databases are done regularly. You will have to create a new forum account and you should be all set.

New GS1100 G Restoration Project. Rebuilding my Dad's bike

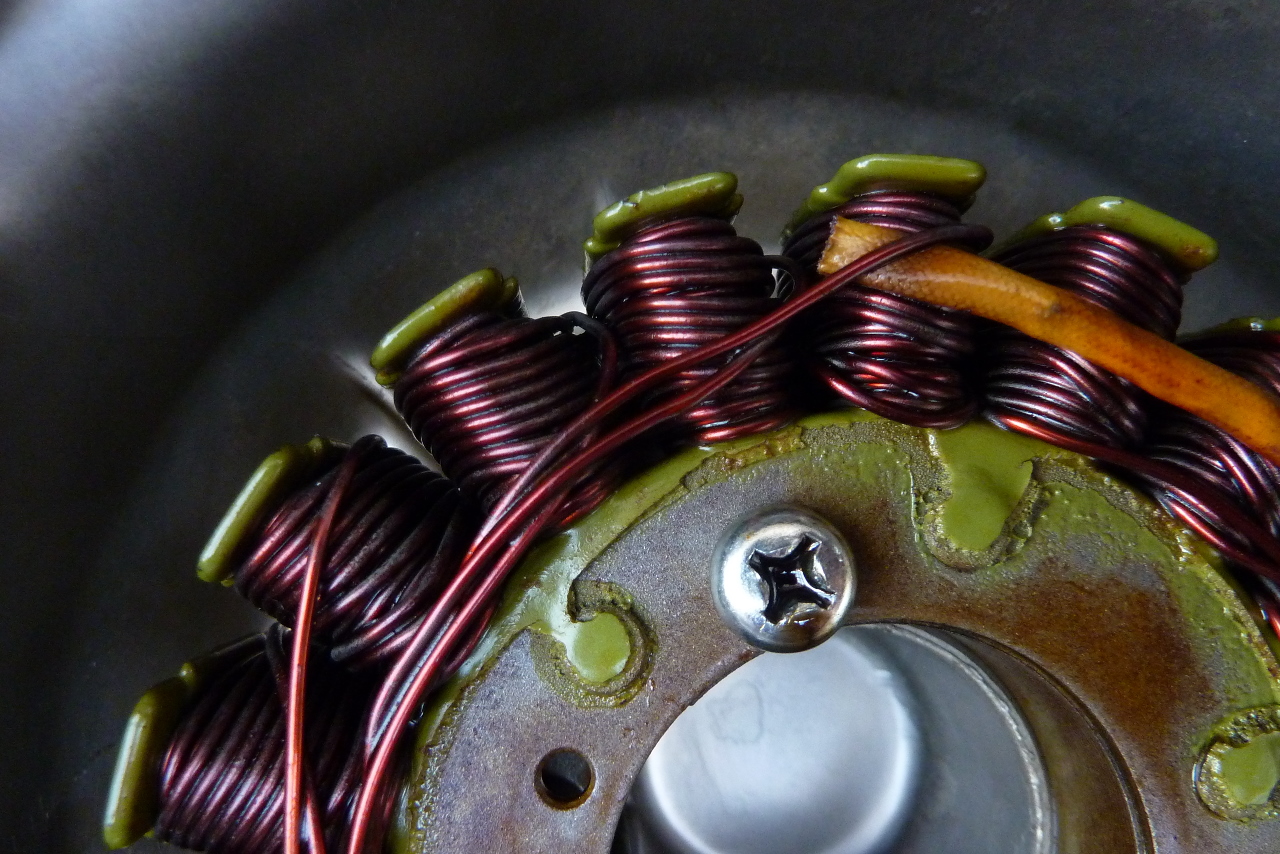
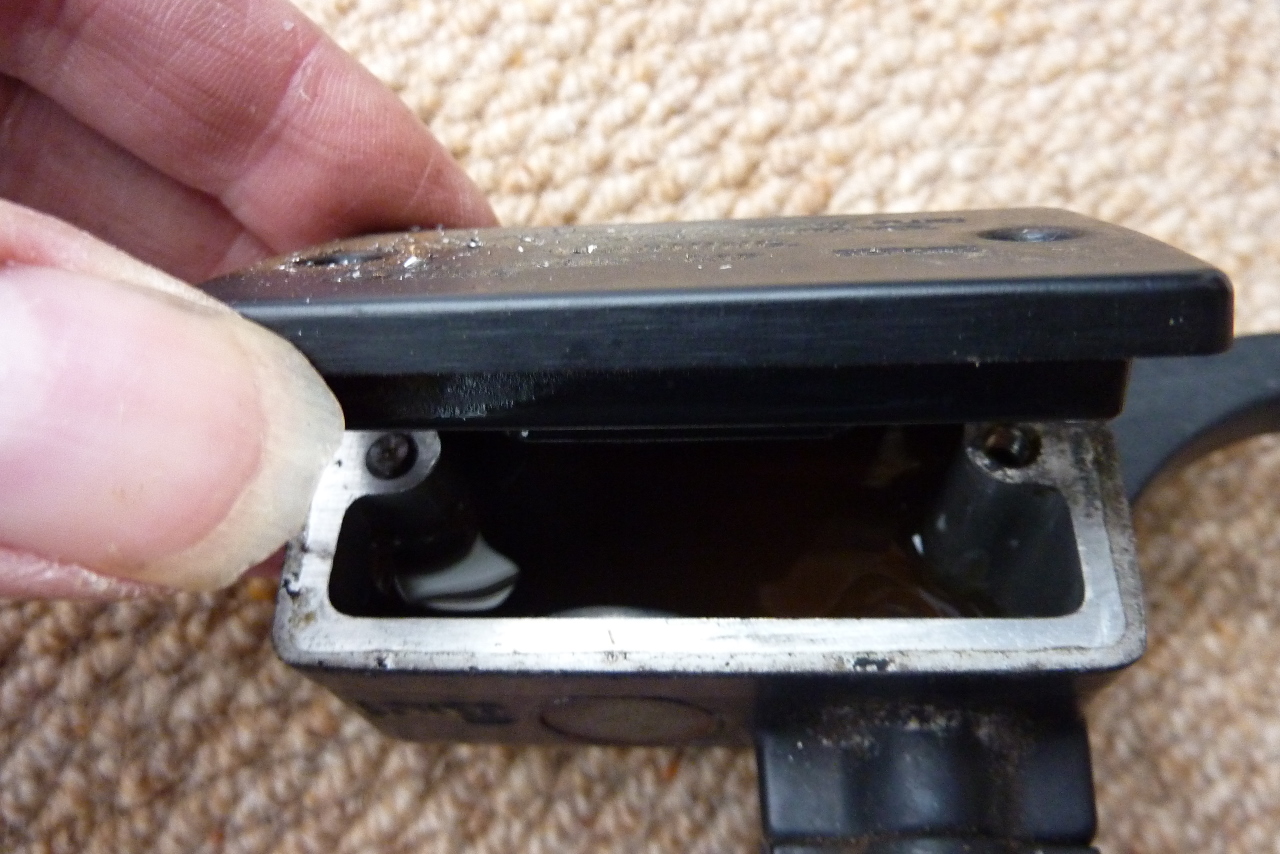
I think we did have the original rectifier. See what you think of this:

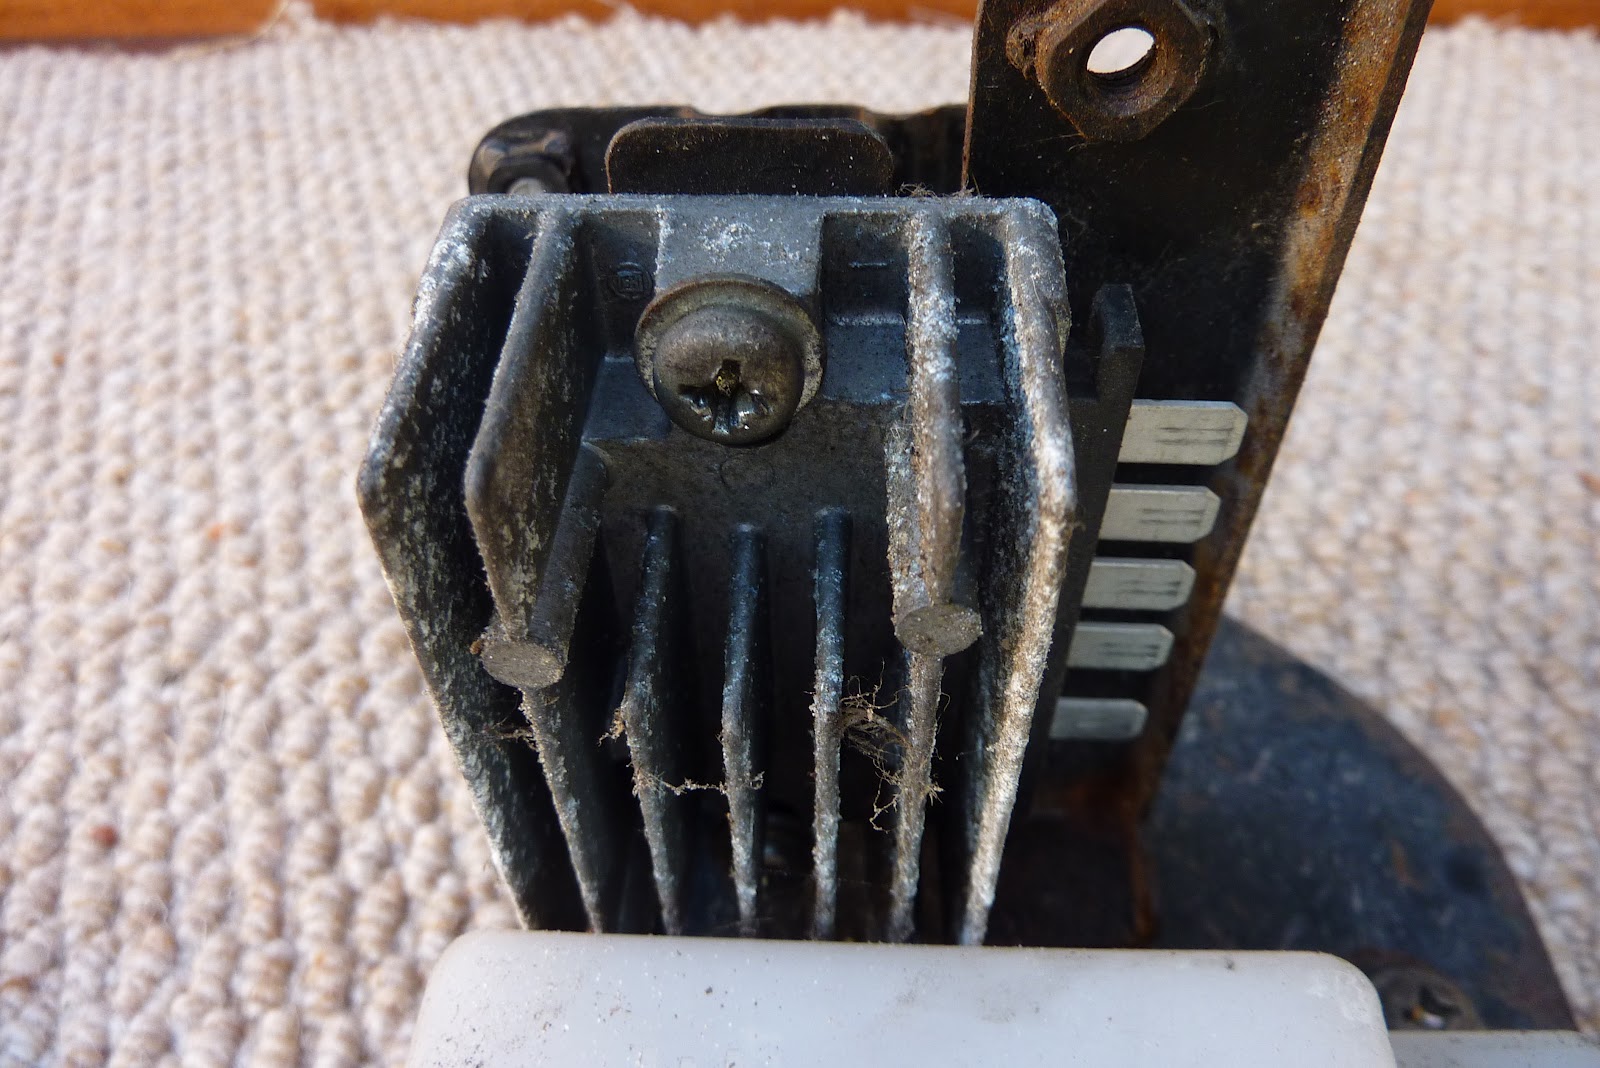
Rectifier Photos on GS1100 Blog

P1040175.JPG
 
Day 66 Macro Questions - Overall Planning

Day 66 Macro Questions - Overall Planning

I must have spent about 3 weeks reading all the threads on this forum. It is trully addictive when you find someone doing exactly what you are in the process of doing. Most of the details are covered. I do however have some big questions that are taxing me as to my overall strategy. I am expecting my restore / rebuild to take 2 years (given my work load and financing) so how would anyone answer these questions:

1. Do I restore bike to 100% concours original equipment or do I restore it so that it has the longest possible life span from now. ie if it is to be 100% original I would not replace crossheaded screws with hex screw but it is sensible to replace with hex if you want to keep it forever and work on it from time to time.

2. To be concours does it need to have 100% original colour scheme?

3. Do I 100% dismantle the bike before restoring any of the bits and start with the frame? Or should I start sending parts away for powder coating now?

4. Will the bike be worth more as 100% OEM or with parts that will make it last longer (ie better rectifier / stator and better fork springs). I realise that I will never get the money back that I am going to put into this restore (I estimate ?5K GBP or $8K USD) but I would prefer to have the restore strategy firmly set up in advance.

Greetings

TIA
 
1. Do I restore bike to 100% concours original equipment or do I restore it so that it has the longest possible life span from now. ie if it is to be 100% original I would not replace crossheaded screws with hex screw but it is sensible to replace with hex if you want to keep it forever and work on it from time to time.
I doubt you'll get her to concours for the money you are thinking of. That usually starts at ?10k. If you are going to ride her I would suggest doing the 'sensible things'; she keeps her character etc but is easier to live with.

2. To be concours does it need to have 100% original colour scheme?
Yes (though it could be a different colour to original, as long as it was available in that colour). Plus the frame has to be painted not powdercoated, all the nuts and bolts have to be the right colour zinc etc The concours boys don't tend to ride.

3. Do I 100% dismantle the bike before restoring any of the bits and start with the frame? Or should I start sending parts away for powder coating now?
I always like to send stuff off for powder coating early on. that way you have a frame you can bolt things to when you have got them refurbished. Other people refurb everything before starting reassembly so it's your call what you feel most comfortable with.

4. Will the bike be worth more as 100% OEM or with parts that will make it last longer (ie better rectifier / stator and better fork springs). I realise that I will never get the money back that I am going to put into this restore (I estimate ?5K GBP or $8K USD) but I would prefer to have the restore strategy firmly set up in advance.

You won't get your money back that's for sure! If your bike was a GS1000 you could probably get a bit more value by keeping everything completely standard (but the cost of achieving that - look at the Ebay exhaust - will make sure it's even more uneconomic). An 1100G isn't an iconic model so is unlikely to be as collectable or highly sought after as ,say, a GS1000S and I reckon nobody would give a second thought if she was wearing upgraded electrics / suspension etc - most would see those things as what they are - upgrades.
 
I tend to restore things to ride and if I can keep in the origional color, with decals without spending a fortune I would. I bought a set of body panels, tank, front fender and rear cowl with good paint for $250.00. That was worth the expense. Would I spend $1200.00 to have someone paint it for me? No! I might learn to paint it myself with good quality paint and decals if I could find them.

I don't want to alter anything so that it can't be brought back to origional. Handel bars, screws, bolt, shocks are fair game. Cutting the frame, altering the shape of a tank, hacking the seat aren't what I want to do unless I have a stock item to replace it with. There are two 1100g that have been done on here which temp me to get a little bolder. JimmyR from Australia and a fellow from Portland, Oregon named Indiesol. I still don't think I go that direction, but they're nice bikes.

If my frame was pretty rusty I would want to have it painted or powder coated before I had the engine up to par as I would be afraid I would never do it once I got it running well.:D I'd want to play, not tear it apart again.

I spend what I can on the bike for what is needed. I don't worry what it is worth because I want to ride this bike, not a 1000s or a Street Triple (ok..:rolleyes: guilty on the Street Triple). Your 1100g has personal value and I have one because I think it will fit my needs for sporty touring bike. That and someone gave it to me free:p. From what I read here, for past and present owners, they are extremely valued by their owners.

For what it's worth...the bolts that hold the stator cover and clutch cover on, I replace them with identical ones if they failed. I think there functional and nice looking. Good luck.

cg
 
A concours bike is a paper weight. Once driven - even down the road a bit, the wear will put you out of the judging of the guys who didn't drive down the road. I've had many years with concours automotive guys and the lengths that are gone through to make everything as delivered (including errors) is mind boggling. As you dig into the concours world, its like a rabbit hole. The more you find out, the littler you know. Not only the EXACT same paint instead of powder(for all surfaces), but the way the paint was put on, what pressure, dipped, where are the factory runs, what areas have less primer than others, were all panels painted at the same time at the same place, using the same methods, allowing for slight variations in hues and finishes, i.e slight orange peel on plastics and not metal panels, etc. - chasing NOS (expensive) parts. All you need is an incorrectly dated headlight and the bike is second rate - you're out. All the fasteners have to be correct with the correct finishes. Not many local platers can replicate some of the factory finishes and a lot of the parts are now in the service replacement mode. I've gotten more than enough service replacement parts for my '82 1100E when ordering from the dealer. These would never, ever fool any judge. While I'm not sure if bikes are judged at that level, most concours events are out of financial reach of average Joe. Make it good enough to fool most people and leave the concours to those with very, very deep pockets. I would imagine as set of mint original tires (proper date codes) would be costly right now if you can find them, and who would want to drive on 30 year old rubber? Price of concours.

I'd guess you would wind up with a $15,000 to $20,000 bike that may fetch $8-$10K in today's market, if you find the right buyer.

Restification is the easiest. Make it look close, but update weak areas - electrical, worn suspension, better modern rubber, etc. And you can drive it. Most insurances for concours vehicles prohibit the driving of them.
 
Last edited:
Really well put. Thanks for a great answer. I never knew that it had to be so meticulous. That is not for me. I woudl like to show it but not at that standard.

Yes I think we will go with restification!

Greetings
 
Thanks for great replies CG and Hampshire. I really didn't know a lot of that.

Take a look at the response below from 6kprunner.

I am going with restification!

Greetings
 
Well someone had to learn the hard way to be an example of what not to do for others. That's why mine is going down the restification route. A few upgrades to bring it closer to current specs, but still retaining as many as the old GS looks as possible. No one can easily see all the electrical upgrades, nor many suspension upgrades - well rear shocks - its possible to build a nice rider that looks so very close to stock and not kill your wallet.
 
Day 68 Front Caliper Seized

Day 68 Front Caliper Seized

More stuff coming off the bike. I knew the all the brakes were seized before I took them apart. But how do get the seized pistons out? More concoction (50% brake fluid and 50% thinners) is needed me thinks.

See the blog here: Front Brake Caliper

P1040629.jpg


P1040630.jpg


P1040631-001.jpg


P1040613.jpg


P1040622.jpg
 
To get the pistons out hook up an airline to the hole where the banjo fits. Make it a push fit using a plastic round piece that you get in the kit for pumping up an airbed etc. Place a thick rag quadrupled over on top of the piston - it'll fly off (and keep fingers out of the way). If the pistons are marked on their sides - even slightly - throw them away. Replace using stainless steel ones and the job is done forever - I think Nick Chambers has them.

Be really careful with the bleed nipples - plenty of your concoction on them before attempting to unwind them (they snap like carrots). Again, replace with SS; buy direct from HEL - they're half the price of anyone else.
 
Can I send you a beer? Great help. I am doing a couple of days with concoction all over and then I am going to use the foot pump and your little trick. I will let you know how it goes.

Greetings
 
Day 69 The Stator is Revealed

Day 69 The Stator is Revealed

I've heard and read so much about these darn stators so I just had to have a look. Was an easy job getting the side off and I wanted to ensure the engine was fully drained of oil as I will be working on it inside a bit later on.

See the blog posting: Stator is revealed.

P1040609.jpg


P1040611.jpg


P1040607.jpg


And the best bit is that the engine cranks really nicely. No seizing here. I was never sure about this as the front rear brakes had seized and the last time we moved the bike we could not determine is the engine would turn as the wheels would not turn. So that is very good news.
 
Last edited:
Day 77 Front Brake Piston Removal

Day 77 Front Brake Piston Removal

(sorry - I have been away for a week. I took my boys to Holland for half term)

Well thanks to Hampshirehog the job is done.

See the Blog here: Front Brake Piston Removal.

P1040629.jpg


P1040919-001.jpg


P1040908.jpg


P1040911.jpg


P1040912.jpg


It's really simple; you just gotta do what they tell you. Attach a foot pump to the air valve which is jammed into the banjo hole. Pump and pop.

Hampshire is now on 2 beers owed. This is getting costly!.

Greetings
 
Last edited:
Wemoto in Southwick, Sussex has the stainless pistons, well worth the extra dosh.
 
Day 84 Front Brake Reservoir Screw Problem Solved

Day 84 Front Brake Reservoir Screw Problem Solved

Solved my problem with a little drilling.

Here is the blog: GS1100 Blog

P1040942.jpg


P1040946.jpg


P1040950.jpg


P1040956.jpg


Greetings
 
Day 84 Front Brake Lever Piston Seized

Day 84 Front Brake Lever Piston Seized

Having got the reservoir lid off I decided to stip the brake lever itself.

Here's my blog: GS1100 Blog

P1040565.jpg


P1040959.jpg


P1040960.jpg


So I have set about this with more concoction.

Greetings
 
Day 84 Shaft Drive and Engine Removal

Day 84 Shaft Drive and Engine Removal

Still not sorted out how to get the shaft drive disconnected before taking out the engine. The rubber boot covers the bolts. How do I get around this:

See my blog here: GS1100 Blog

P1040962.jpg


P1040972.jpg


P1040974.jpg


P1040977.jpg


I need to get the gold bolts out but it is proving impossible.

Any ideas?

Greetings
 
Remove the special 4 bolts at the engine side and the flange/shaft will come out.
I used an extra long handled 13 mm wrench and hit it with a dead-blow hammer IIRC.
They are fine thread and have lock tite on them from the factory. Don't loose those bolts!
They are grade 12.9 with a reduced head size. (Special bolts)
 
great work with the screw.

In answer to the questions on your blog.

The master cylinder.
That boot around the end of the pistion simply pulls off, expect it to be trashed in the process. under the boot the piston is held in with a circlip.
Once the circlip and the washer are removed the pistion can be pulled out with pliers..rebuild kits have pistons and boots in them.

Undoing Drive shaft.
you have to pull the swing arm.
you can leave the wheel assembled, but you have to remove the rear portion of the guard,and the brake hose. release the top shock mounts and the pivot bolts , then you can roll the assembly out the back. the drive shaft will slide out of the swing arm, once you unbolt and remove it. you can put the swing arm back in p[aceto move the bike.
 
Day 85 Engine Removal

Day 85 Engine Removal

It was a big day for us today. We got the engine out. This was a big (no, huge) job. It took 3 of us about 2 hours despite spending 84 days preparing the bike (well not full time at least!):

See the blog here: GS1100 Blog

This is the video my wife graciously (well there were some moments where the grace was lacking) filmed. I cut the 2 hour job down to about 8 minutes of video. Anyone considering taking a big engine out of one of these bikes, take a look and see what you are up against.

Of course the next time you do it, it gets easier. But your first time will look like this:

https://www.youtube.com/watch?v=lZP_u32WdJk

I will detail a more exhaustive technical appraisal of this procedure in another post.

Greetings
 
Back
Top