• Required reading for all forum users!!!

    Welcome!
    Register to access the full functionality of the GSResources forum. Until you register and activate your account you will not have full forum access, nor will you be able to post or reply to messages.

    A note to new registrants...
    All new forum registrations must be activated via email before you have full access to the forum.

    A Special Note about Email accounts!
    DO NOT SIGN UP USING hotmail, outlook, gmx, sbcglobal, att, bellsouth or email.com. They delete our forum signup emails.

    A note to old forum members...
    I receive numerous requests from people who can no longer log in because their accounts were deleted. As mentioned in the forum FAQ, user accounts are deleted if you haven't logged in for the past 6 months. If you can't log in, then create a new forum account. If you don't get an error message, then check your email account for an activation message. If you get a message stating that the email address is already in use, then your account still exists so follow the instructions in the forum FAQ for resetting your password.

    Have you forgotten your password or have a new email address? Then read the forum FAQ for details on how to reset it.

    Any email requests for "can't log in anymore" problems or "lost my password" problems will be deleted. Read the forum FAQ and follow the instructions there - that's what we have one for...

  • Returning Visitors

    If you are a returning visitor who never received your confirmation email, then odds are your email provider is blockinig emails from our server. The only thing that can be done to get around this is you will have to try creating another forum account using an email address from another domain.

    If you are a returning visitor to the forum and can't log in using your old forum name and password but used to be able to then chances are your account is deleted. Purges of the databases are done regularly. You will have to create a new forum account and you should be all set.

JohnnyL's 1980 GS550L Cafe Build

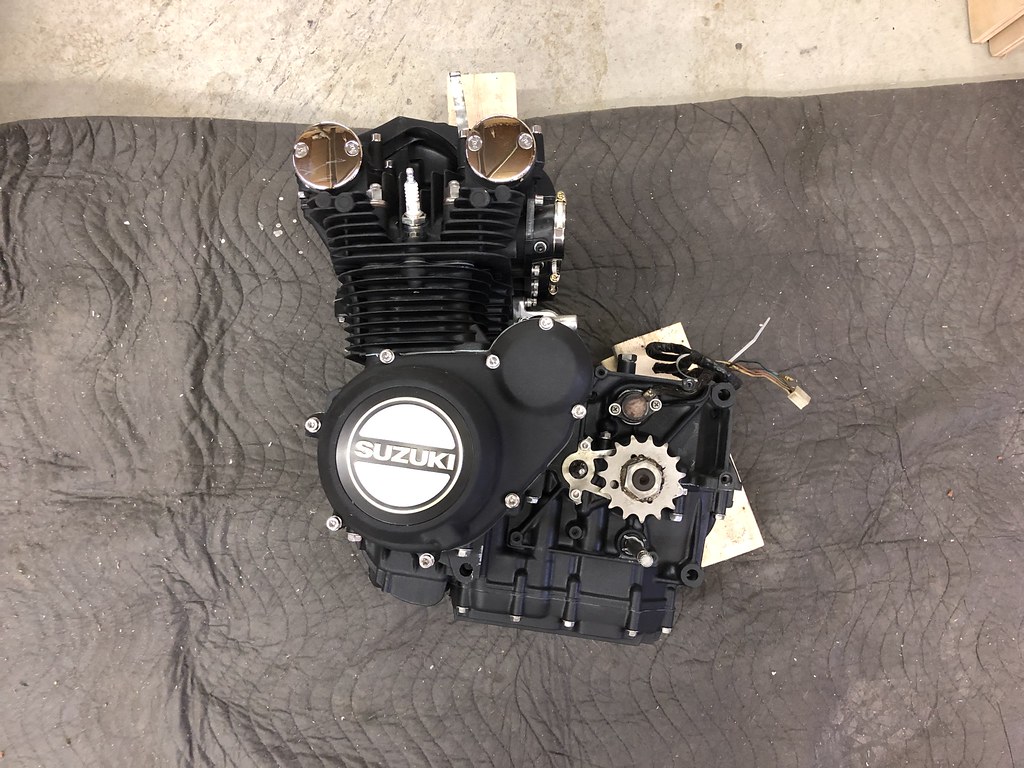
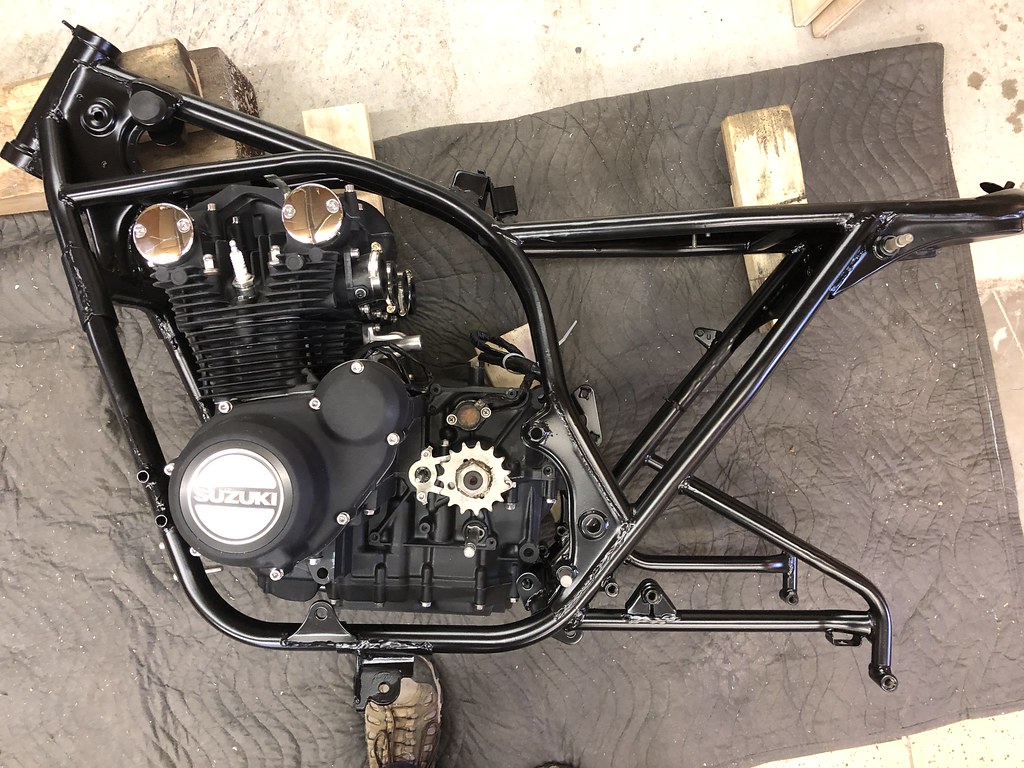
HUGE question! When I built my son's 69 CL350 Cafe, I laid the engine on it's side on the floor on blankets and lowered the frame over the engine and then bolted it to the chassis. It was so easy that I did it completely by myself. Do you think it is possible to do that with this GS? This engine is SO heavy! I'm scared to death I am going to scratch the powder coat on the frame or the engine paint trying to lift the engine into the chassis on the bike lift.

Yep, that's generally the method espoused around here. An old tire with a towel or blanket over it can do a pretty nice job of holding an engine. I haven't done it like this personally, though. I've had the bike held upright on a lift, and brought the engine in from the side.

Another hint is to cover the frame tubes with something. There are plastic covers for shower rods that serve well for this. Foam pipe insulation is a little too thick and gets in the way. Masking tape and other methods of padding and protecting finishes are very helpful.

And of course, get some help.

I've replaced a GS850 engine by myself a couple of times (the heaviest of all GS engines, I think) and several other engines. Can't say I'd recommend flying solo, but it can be done if you're stout of back, clear-minded, and your soul is pure...

Either way, it's basically impossible to do without banging something together, so if the finish matters, you'll need to protect it.
 
Starting to look like a motorcycle now. I laid the engine on the floor with a bunch of blankets. I then blocked the engine so it was sitting level. By removing the breather plate on the top of the engine, there was plenty of clearance to lower the frame right over the engine. I little blocking around the frame to enable me to line up the engine mounts, and voila! New Stainless engine mount bolts and washers installed. I will torque all the bolts once the bike is sitting upright on the lift.

I'm a pretty impatient guy. LOL. I didn't want to wait for my son to get home from school. However, I am going to need his help lifting this assembly onto the lift. Guess I'm going to HAVE to be patient now till about 3:30.

49358135942_34d9e360c3_b.jpg


49357934526_75f2746318_b.jpg


49357472208_103e853a46_b.jpg
 
Hi, I don't think you need a ignition switch, you could put a m-lock rfid fob into your m-unit ignition input like I did or just leave it as is. I highly recommend the cable kit because it is metric and color coded. The wire size will be exact for your switches and m-unit. The color coding makes installation like paint by numbers, I did not need to make a wiring diagram. Don't forget to use ferrules on the wire ends. Your bike is looking awesome.
 
...lower the frame right over the engine. I little blocking around the frame to enable me to line up the engine mounts, and voila!

Nice job! Reminds me of the times I single-handedly swapped engines on a Camaro and VW Beetle. Lone wolfs rule!
 
Nice job! Reminds me of the times I single-handedly swapped engines on a Camaro and VW Beetle. Lone wolfs rule!

Ha! That doesn't even sound right. Did it drive backards? Would love to see that thing!

Hi, I don't think you need a ignition switch, you could put a m-lock rfid fob into your m-unit ignition input like I did or just leave it as is. I highly recommend the cable kit because it is metric and color coded. The wire size will be exact for your switches and m-unit. The color coding makes installation like paint by numbers, I did not need to make a wiring diagram. Don't forget to use ferrules on the wire ends. Your bike is looking awesome.

Good advice! After spending $445 on the M-Unit and M-Button, I couldn't bring myself to spend the $78 on the wire. I might as well though I guess.

Looking very nice indeed 👍😁

Thanks!

I got tired of waiting for my son to help me get the bike on the lift so I dragged it on there myself. I'm sure my back will thank me tomorrow for my impatience. I made some headway today. Bike is shaping up! I wish I had the wheels. If I did, I'd have a roller. Oh well. Plenty of other things to work on.

Rear swing arm is installed. Installed new bearings.
Rear brake reservoir is installed.
Rear caliper and torque link bar are installed.
New steering stem bearings are installed.
Steering stem is installed.
New Terozzi Rearsets are installed. However, the shifter linkage is going to need some tweaking.

Really looking forward to having Brian Wringer over tomorrow so we can get a jump on this wiring!

49358794877_23eb9b0627_b.jpg


49358132828_23e1fec44b_b.jpg


49358132668_8737744ba6_b.jpg


Malik was no help in putting the engine in or moving the bike!

49358795032_8d33d3e2aa_b.jpg
 
Yes, very impressive work on the restoration. Nothing like having your own "brand new" old bike. Of course you realize that it will have to make the trip to Bedford in June.
 
Thank you for the breakdown on the costs of the powder-coating.
Those numbers are in the same ballpark as i have been quoted. Especially when they add the extra attention to detail in masking off areas....i don't think they are overly pricey.

I'm figuring Malik's skills are more in line with security as opposed to lifting.
 
So I am making some headway on the bike. I'm actually running out of things to bolt on at this point. I'm running into a few small issues.

1. I need some different length braided stainless steel brake lines. Need to order those.

2. I went to bolt on the air filter pods and the two outer ones won't fit. The frame is in the way. Any suggestions? They're APE air filters and they said these are the ones I need.

3. I currently have 340mm rear shocks on there but since I am lowering the front end by 1", I figured I better lower the rear by 1" so I ordered new 320mm shocks

4. I'm not happy with how the MAC 4 into 1 exhaust looks. It's just too much pipe. I think I am going to order a reverse cone 18" stainless shorty quieter core exhaust from Dime City Cycles. Also, the exhaust doesn't even seem to fit right. It's rubbing on the frame. See pics below.

5. The new Dyna Coils will not just bolt on. They're too fat so I am going to have to fabricate some sort of offset plate.

6. My new Acewell gauge hits the top steering stop on the steering tube. I'm either going to have to cut a little off of the steering stop or fabricate a new bezel plate for the gauge. Not a big deal.

7. I posted a question somewhere on here about the Tarozzi Rearsets. I wanted to buy them from a company here in the US but they said it would take 6-8 weeks and they only fit European models. He also stated that people have tried to make them work with no success. I don't know what he is talking about. I ended up ordering a set from Disco Valante somewhere over in Europe and they arrived within 10 days. The brake side bolted right on with no problem. The shifter side is going to take a little tweaking but it's not going to be difficult. The linkage from the pedal to the shift rod is just a little too long.

8. The headlight bracket that came with my headlight is junk so I am on the hunt for a new bracket.

49363444691_ebce191552_b.jpg


49363444466_f8b7db8711_b.jpg


49363659182_845f02227a_b.jpg


49363659052_1bfa2f3fa2_b.jpg


49362986158_3de2942362_b.jpg


49363658787_e661b0bd65_b.jpg


49363658692_0fe2d32095_b.jpg


49363658557_7afbe03ba0_b.jpg


49363726602_33fcf64bac_b.jpg
 
Last edited:
Holy smokes am I a dummy. I had the shifter side foot peg mounted upside down! Haha! I can confirm that the Tarozzi Rearsets do indeed bolt right onto a 1980 GS550L.

Upside down
49364539632_dde1ef3992_b.jpg


​Rightside up
49364328416_4fdcd40590_b.jpg
 
Last edited:
Uh....you wouldn't be able to lean if you left the rear set like that!

Thanks for the pics and narrative...lookin' good!!!

Ed
 
Uh....you wouldn't be able to lean if you left the rear set like that!

Thanks for the pics and narrative...lookin' good!!!

Ed

Haha! I know right!? I sat on the bike and realized that one foot was lower than the other and more forward. I was ticked that I was so dumb but elated that it was going to work without any effort. They are folding pegs so if I ever lean too far, the pegs will fold right up. But if I lean that far....I'll be ready for Moto GP. LOL!
 
I was hesitant when it came to paying $300 for the Tarrozi rear sets for my GS1000S..until I got them, and with no modifying what-so-ever, they just bolted right on..and to this day, 10 years later, perform flawlessly. A quality product for sure.

Your bike is looking real nice, I always look forward to updates.
 
I didn't get much time today to work on the bike. Too many other priorities got in the way today.

I just stood in front of the bike to try and figure out this exhaust. No matter how or what I do, this stupid passenger foot peg section of the frame is in the way. I can't believe I'm thinking of doing this after powder coat but...I'm considering cutting these sections of the frame off. I think I can do it and leave a little section of pipe sticking out that I could put a decorative aluminum spindle on the end of the pipe. Picture like a bar end weight on handlebars. The aluminum barrel would have a stud that goes into a rubber cork with a nut and washer on the inside of the pipe. Tighten the aluminum barrel and it would squeeze the cork tight inside the stub of frame tube. Any other ideas? I don't really need that section of frame. I thought I was going to be using the passenger foot peg to bolt the exhaust on but it just doesn't line up right. That bassoon of a muffler just sticks out so far and it still rubs on that section of frame. Even if I went with the reverse cone, it would still hit the section of frame that I'm thinking of cutting off.

49368905163_bfe44ee3fd_b.jpg


49369366601_b49487ca6d_b.jpg
 
Back
Top