• Required reading for all forum users!!!

    Welcome!
    Register to access the full functionality of the GSResources forum. Until you register and activate your account you will not have full forum access, nor will you be able to post or reply to messages.

    A note to new registrants...
    All new forum registrations must be activated via email before you have full access to the forum.

    A Special Note about Email accounts!
    DO NOT SIGN UP USING hotmail, outlook, gmx, sbcglobal, att, bellsouth or email.com. They delete our forum signup emails.

    A note to old forum members...
    I receive numerous requests from people who can no longer log in because their accounts were deleted. As mentioned in the forum FAQ, user accounts are deleted if you haven't logged in for the past 6 months. If you can't log in, then create a new forum account. If you don't get an error message, then check your email account for an activation message. If you get a message stating that the email address is already in use, then your account still exists so follow the instructions in the forum FAQ for resetting your password.

    Have you forgotten your password or have a new email address? Then read the forum FAQ for details on how to reset it.

    Any email requests for "can't log in anymore" problems or "lost my password" problems will be deleted. Read the forum FAQ and follow the instructions there - that's what we have one for...

  • Returning Visitors

    If you are a returning visitor who never received your confirmation email, then odds are your email provider is blockinig emails from our server. The only thing that can be done to get around this is you will have to try creating another forum account using an email address from another domain.

    If you are a returning visitor to the forum and can't log in using your old forum name and password but used to be able to then chances are your account is deleted. Purges of the databases are done regularly. You will have to create a new forum account and you should be all set.

JohnnyL's 1980 GS550L Cafe Build

I'd need to do some eyeballin' and measuratin', but...

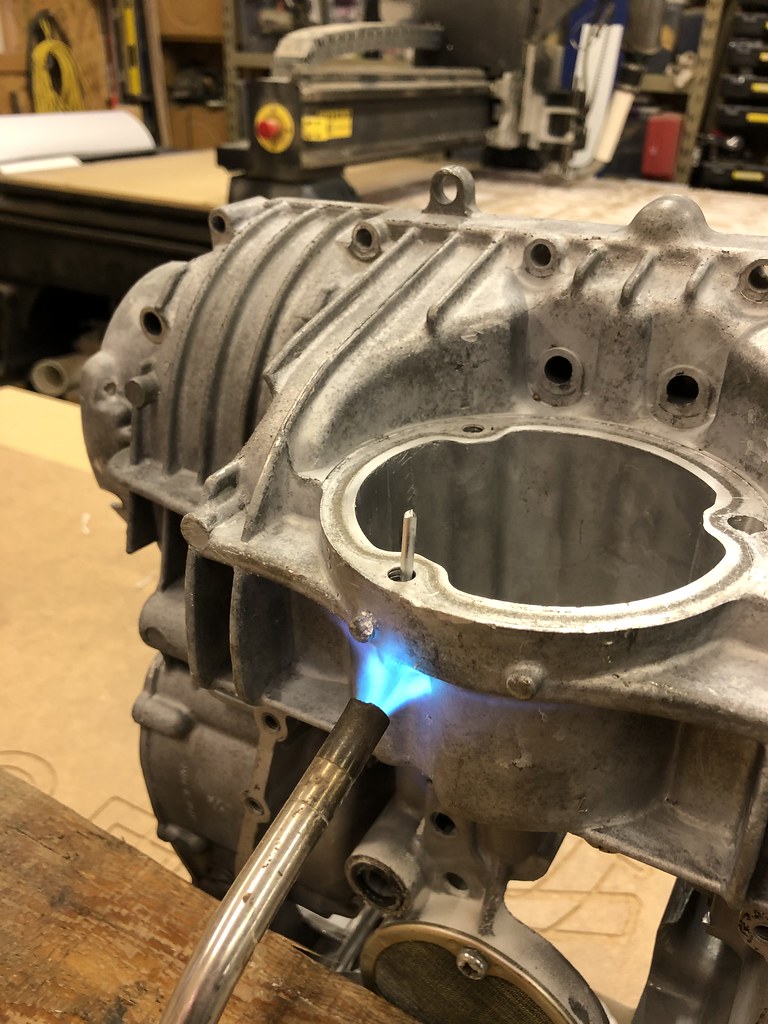
From what I understand, brazing (or using those magic aluminum soldering/brazing rods) on engine cases is really difficult; it's very difficult to get enough heat into the metal without melting a spot. That said, I haven't done it nor have I seen it done, so I dunno.

I've got some scrap KLR650 cases if you want to fire up Youtube and practice... :p


One possible fix without melting stuff could be to install an M8/M6 "step stud". This is a stud with an 8mm thread on one end and 6mm (like the original oil filter cover studs) on the other. Drill and tap for 8mm, smear the big end of the new stud with JB Weld, then install. Should end up oil tight and pretty much permanent. There's very little stress on this stud, and plenty of aluminum "meat" there for a larger hole.

Not sure this one's long enough, but this is the idea:
S6x8x23%20Metric%20Step%20Stud%208mm%206mm%2023mm%20Coarse.jpg

https://www.belmetric.com/metric-step-studs-6810mm-c-9_73/s6x8x23blk-step-stud-black-p-6055.html


Or maybe:
S6x8x31%20Metric%20Step%20Stud%20M8%20M6%20Yellow%20Zinc%20Coarse.jpg

https://www.belmetric.com/metric-st.../s6x8x31ylw-step-stud-yellow-zinc-p-9402.html


A solid thread insert is another option, but keeping it from leaking could be a concern. Not sure there are any with solid bottoms.
 
I'm thinking Brian's solution is the best way. I am personally going to try to remember those even exist. I can't count how many jambs those could have pulled me out of. Not to mention, My GS, both engines, have a couple stripped holes. Anyway, I also want to mention, that it would be an interesting experiment to try a few different brazing / soldering techniques on an engine case.

https://www.alumiweld.com/h2uaw.html

https://www.harborfreight.com/8-pie...MI5rySlo355QIVLv_jBx2PJgT4EAQYAiABEgKtGvD_BwE

https://www.instructables.com/id/How-to-Weld-Aluminum-Without-a-Welder/
 
Cool!

The GSR Hive Mind eagerly awaits your report.

This seemed interesting from the Alumiweld page:
Stripped Threads
Drill old threads out oversized so when filled with AlumiWeld all drilling and tapping will be done in AlumiWeld this will make it easier to work with. After drilling, heat base metal from bottom of the hole up.Tin the wall of the hole beginning at the bottom and working your way up. Fill the hole, let cool, drill and tap as needed.

Since that hole in your bike is open at the bottom, it's doubtful that dunking a stud or bolt in like the guy in the video will be possible.

Let us know how it goes!
 
Also, I would not be shocked if that shim is a Kawasaki shim that's 29.0mm in diameter instead of Suzuki's 29.5. See how well the chunks seem to fit in a Suzuki bucket.

These sorts of mixups are not uncommon; I've found Kawasaki shims in Suzukis a few times. If this is what happened on your bike, check the rest -- you might have more sloppy Kaw shims lurking in there.

I will definitely check all the other shims. I did have to order a new tappet because the lip was damaged and wallered out.

I’m really hoping the brazing rods work because after further review, the po had drilled out the other two oil filter cap holes also. Two had 1/4-20 bolts in them and the one that broke through the case was a 5/16-20. I will be filling these and putting the proper metric studs in them.

I received my new/used cams today from eBay. They look pretty damn good for $40. I'll need to put some calipers on them to make sure they're within spec.

49097174381_afcd16d266_b.jpg


49096666053_9941bae61b_b.jpg
 
Last edited:
The aluminum brazing rods worked.

I put a map gas torch on the case in the are that needed to be repaired. I let it sit there for about 30 minutes. It wasn't getting hot enough to melt the brazing rods so I broke out the acetylene torch and heated it up even more. I never did get the brazing rod to just melt without putting it under the torch and puddling it in the hole. I was skeptic that this would work and actually bond to the case. However, I proceeded to drill out the holes and re-tap them to a 6mmx1.00 thread. The aluminum brazing held!

I believe I'm good to go now. On to spraying VHT primer on the engine and wait for my Harley Davidson texture black paint to come in.

49101409373_b3621bc83d_b.jpg


49101920826_7be9cfcd26_b.jpg


49101936981_0ee347c2a0_b.jpg
 
Project update:

I was waiting on paint from Harley Davidson. I purchased their texture black but they were out. It took a week and a half to get it in. I received it yesterday and painted the engine this morning. I couldn't be happier with how it turned out. It was extremely easy to spray. Very forgiving. I will be putting the pieces in a 200 degree oven for an hour to bake the finish. Then it's on to re-assembly of the engine!

49147465902_dc79828eff_b.jpg


49147466212_e9dde3390f_b.jpg


49147466342_bd5b347c0e_b.jpg


49147261376_e305d23c52_b.jpg


49147466627_1d3f3bb1de_b.jpg


49146767018_d7a7f22b58_b.jpg
 
I'm about to run out to see Ford vs. Ferrari. I'll come back and post the progress of how I got to where I am at right now. The motor is almost done. I need to go back and lap the valves and install the cams. But I just couldn't wait to see what it was going to look like complete. I'm pretty happy with how it turned out! Enjoy the pics!

49154176572_fa39607af2_b.jpg


49153470118_8c47d42519_b.jpg


49153969676_18e0d97171_b.jpg


49153969331_a83aba1e48_b.jpg


49153968986_80536f0f93_b.jpg
 
That is a really nice look. I hope the paint will last for years to come.
Good job on your part.
 
Nice!

I used PJ1 to paint my GS850's engine, and it's held up pretty well. Never thought to look around in the Harley world for engine paint.
 
Looks good!

BTW, there is a product called S100 Engine Brightener that works really well on that Harley paint. It will bring it back to a bright black once it starts to fade. I use it once a year on my Harley and it makes the engine look like it just came off the showroom floor!
 
Thanks for the compliments fellas! Now let me backtrack a little bit as to what was done to get to this point.

I cooked the engine pieces in the oven at 200 degrees for one hour.(Yes! My wife is pretty awesome for allowing me use the oven for this.) I am very impressed with how durable the Harley Davidson paint is after baking. I did a pretty good job of masking all the mating surfaces but nonetheless, I still had to go back and clean some of them up with a razor blade on edge.

49154180207_e1bc1736a1_b.jpg


After all the pieces had cooked, I was ready to mate the case halves together again. After cleaning the crank shaft and transmission gears in parts cleaner, I thoroughly blew them off with air and lubed all of the bearings with assembly lube. I fitted new seals on the crank and the transmission. I then fitted the crank and transmission into the top half of the case.

49154179437_f7a4d1af22_b.jpg


Once again, I checked the mating surfaces and then cleaned them off with paint thinner. Using Threebond 1184, I applied a very thin layer of liquid gasket to the bottom case. Using my finger, I smeared the threebond evenly across the surfaces.

49153472878_d8af5e036c_b.jpg


49153473028_8e9154a6e3_b.jpg


After running over all the bolts with a brass wire wheel on my bench grinder, I put them in their appropriate places. I had made a bolt diagram with a piece of cardboard when I took the case apart. All the 8mm crankcase bolts were tightened to 14.5 ft lbs and the 6mm bolts were tightened to 7.2 ft lbs. All were tightened according to the order stamped on the case. Thanks Suzuki!

49153472573_017a35bf17_b.jpg


49153472443_f68ce4ea22_b.jpg


Next was the new gasket for the oil pan and bolting on the oil pan.

49153971581_687cf6ac11_b.jpg


49154178377_079c6e6396_b.jpg


Next I installed the clutch bearings and basket. All clutch plates and springs were well within spec so I decided to reuse them.

49153470873_6a67a676fd_b.jpg


A new gasket was fitted for the clutch cover, points cover, generator cover and new stainless steel bolts were installed.(Bye Bye gis screws!) A note about the stainless steel bolts. It is recommended to install these with anti-cease on the threads and DO NOT tighten these to Suzuki specs. 8mm stainless bolts get tightened to 10.7 ft lbs, 6mm bolts get tightened to 4.4 ft. lbs.

49153470638_4ff07b3c3c_b.jpg


That brings us to where I am today.
 
Well crap! I forgot all about putting the cylinder head on. Obviously I got it on but I forgot to tell you how. I didn't take any pictures of the process so I'll just let you know that I replaced all of the piston rings with new rings, honed the cylinder walls, oiled the cylinders and rings. Installing the pistons onto the rods was pretty straight forward. I didn't need to use any clamps or anything. With a little oil and hand force, the gudgeons went right in. Being extremely careful not to drop the circlips into the case, they went in relatively easy too. Lowering the jugs onto the pistons went really well. No ring compressor was necessary. The jugs have a nice bevel into the bottom of them that make inserting the pistons pretty simple. A small screw driver to poke the ring in while pushing down on the jugs comes in handy here. Pretty much home sweet home from here.

Today I was able to get the valves lapped and installed. Using some Permatex Valve Grinding Compound, some fuel tubing, a screw and a drill, this was relatively painless. I brushed just a little bit of compound on the seating surface of the valve. I then oiled the valve shaft and inserted it into the guide. On the top side of the engine, I put a short piece of fuel hose over the end of the valve stem. On the other end of the hose, I put a 1/4-20 stud. From here, I put my drill on the stud that's inserted into the hose. On low speed, I ran the drill. You can here the grinding tone. Running the drill backwards and forwards, applying pressure and not, you can here it start to smooth out. Pictures below are before and after and the drill process described.

Before valve grinding
49160018107_6d804c407d_b.jpg


49159303408_d061707117_b.jpg


After valve grinding
49159788151_2f12ea766d_b.jpg


49160017612_85526757a9_b.jpg


Process
49160017822_0c46b1a80c_b.jpg


After that, I cleaned all the valves in parts cleaner to get off any remaining compound. I also cleaned the heads well with some paint thinner. I put in new valve seals and I then oiled the stems and re-inserted them into the guides paying close attention to which one went where. Using a valve compressor, I installed all the springs and their keepers. All springs were within spec.

49160018272_2df44e4bed_b.jpg


49160017512_1f934e83ab_b.jpg


49160017352_1b739da201_b.jpg


All the buckets and shims were installed at this point. I also installed a new bucket where the old one had been damaged.

49159787341_9bed3f3143_b.jpg


49160017252_514e0ab323_b.jpg
 
Now it was on to installing the new/old cams. I say new because the old one was damaged from the lose shim. I had to purchase used cams from eBay. This process is pretty straight forward. Install the exhaust cam first. With cylinders 1 and 4 at TDC, place the exhaust cam into the chain with the 2 and arrow pointing up. Count 20 pins over from where the 2 is and install the intake cam in with the 3 and arrow pointing towards the 20th pin.

49159786941_2c5b15d192_b.jpg


Install the bearing caps and torque to 8 ft lbs.

Then install the cam chain tensioner.

Now I was ready to check valve clearance. Here is where things are a mess.

#1 intake is .0015 2.55 shim
#2 intake is missing a shim
#3 intake has no clearance 2.65 shim
#4 intake is .003 2.6 shim

#1 Exhaust is .005 2.6 shim
#2 Exhaust has no clearance 2.6 shim
#3 Exhaust has no clearance 2.65 shim
#4 Exhaust has no clearance 2.6 shim

Do I buy and entire shim kit for $180 and start over???
 
Awesome. Get the spreadsheet from Steve if you don’t already have it. It’ll clarify what sims you need to replace with what. Just have to punch in the numbers you reported above.
 
Now it was on to installing the new/old cams. I say new because the old one was damaged from the lose shim. I had to purchase used cams from eBay. This process is pretty straight forward. Install the exhaust cam first. With cylinders 1 and 4 at TDC, place the exhaust cam into the chain with the 2 and arrow pointing up. Count 20 pins over from where the 2 is and install the intake cam in with the 3 and arrow pointing towards the 20th pin.

49159786941_2c5b15d192_b.jpg


Install the bearing caps and torque to 8 ft lbs.

Then install the cam chain tensioner.

Now I was ready to check valve clearance. Here is where things are a mess.

#1 intake is .0015 2.55 shim
#2 intake is missing a shim
#3 intake has no clearance 2.65 shim
#4 intake is .003 2.6 shim

#1 Exhaust is .005 2.6 shim
#2 Exhaust has no clearance 2.6 shim
#3 Exhaust has no clearance 2.65 shim
#4 Exhaust has no clearance 2.6 shim

Do I buy and entire shim kit for $180 and start over???


Give me a holler. I have shims galore, it's cold here, and I'm bored. :cool:

And if you somehow need more shims, Cycle Recycle II downtown has them for $5.

On zero clearance valves, you just have to go down a couple of sizes and see what you've got. Fortunately, you don't have to yank the dang camshafts every time.
 
I hope that you are not rotating the engine without a shim in the vacant bucket? The edges of that cam lobe look a little rough...
 
Back
Top