• Required reading for all forum users!!!

    Welcome!
    Register to access the full functionality of the GSResources forum. Until you register and activate your account you will not have full forum access, nor will you be able to post or reply to messages.

    A note to new registrants...
    All new forum registrations must be activated via email before you have full access to the forum.

    A Special Note about Email accounts!
    DO NOT SIGN UP USING hotmail, outlook, gmx, sbcglobal, att, bellsouth or email.com. They delete our forum signup emails.

    A note to old forum members...
    I receive numerous requests from people who can no longer log in because their accounts were deleted. As mentioned in the forum FAQ, user accounts are deleted if you haven't logged in for the past 6 months. If you can't log in, then create a new forum account. If you don't get an error message, then check your email account for an activation message. If you get a message stating that the email address is already in use, then your account still exists so follow the instructions in the forum FAQ for resetting your password.

    Have you forgotten your password or have a new email address? Then read the forum FAQ for details on how to reset it.

    Any email requests for "can't log in anymore" problems or "lost my password" problems will be deleted. Read the forum FAQ and follow the instructions there - that's what we have one for...

  • Returning Visitors

    If you are a returning visitor who never received your confirmation email, then odds are your email provider is blockinig emails from our server. The only thing that can be done to get around this is you will have to try creating another forum account using an email address from another domain.

    If you are a returning visitor to the forum and can't log in using your old forum name and password but used to be able to then chances are your account is deleted. Purges of the databases are done regularly. You will have to create a new forum account and you should be all set.

taking the plunge

  • Thread starter Thread starter Zbradley1215
  • Start date Start date
Z

Zbradley1215

Guest
well hello all,
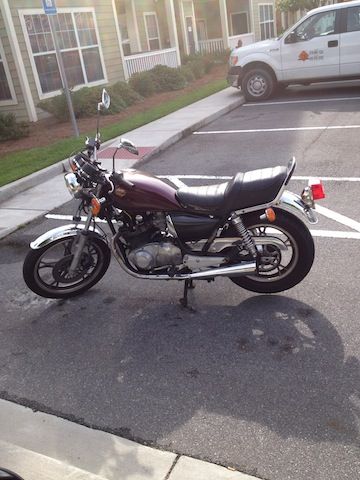
so after owning my 83 gs450L for maybe a month and a half, riding it around a little, scouring this website, and digging for all the cash i can get, i have decided to start my rebuild process and make a page for it.

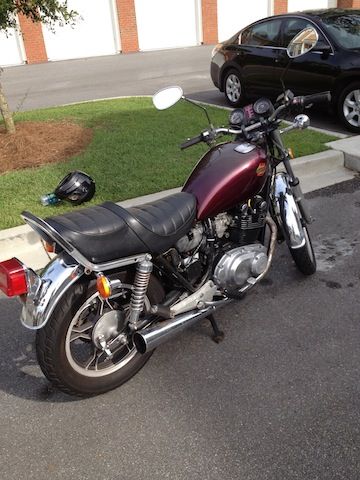
when i first got the bike, i was very excited about making look "cool" to me. i tore off the front and rear fenders, painted them black, and started thinking of what to spend my money on next to make it how i would like to see it. well all of a sudden a light went on and i thought to myself, " wouldnt it be better if this thing ran great and wont leave me hanging on the side of the road rather than just have cool looking bike that wont run?"

so i told the wife to stop me from making unnecessary cosmetic purchases and help me focus on getting it running well. she told me that she doesnt care if i buy parts and stuff just as long as im spending less than 20 bucks at a time. awesome.

well the first "real" ride i took it on was about 60 miles round trip. i live near the beach and thought what the heck lets go to the water. i rode, enjoyed the wind and sun, got about 6 miles from the beach and was stuck in bumper to bumper traffic that i knew wasnt gonna move fast. needless to say i gave up and headed home. on the way home, i noticed it was shifting funny, i got into my apartment complexes parking lot and opened to oil cap and saw it was down to the bottom line, all in all it took about 1/2 quart to fill it back up.
the following weekend i decided to make the same trip and this time i made it. while at the beach i stopped to refuel and check the oil and again it was low a half quart. i filled it up and headed home.
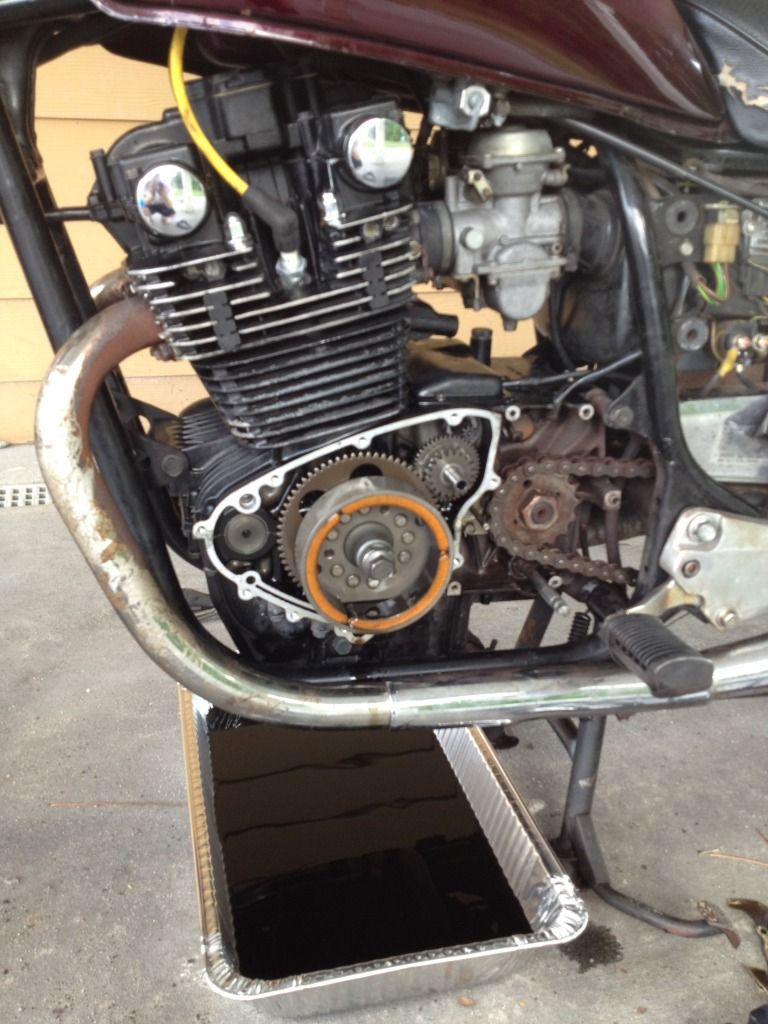
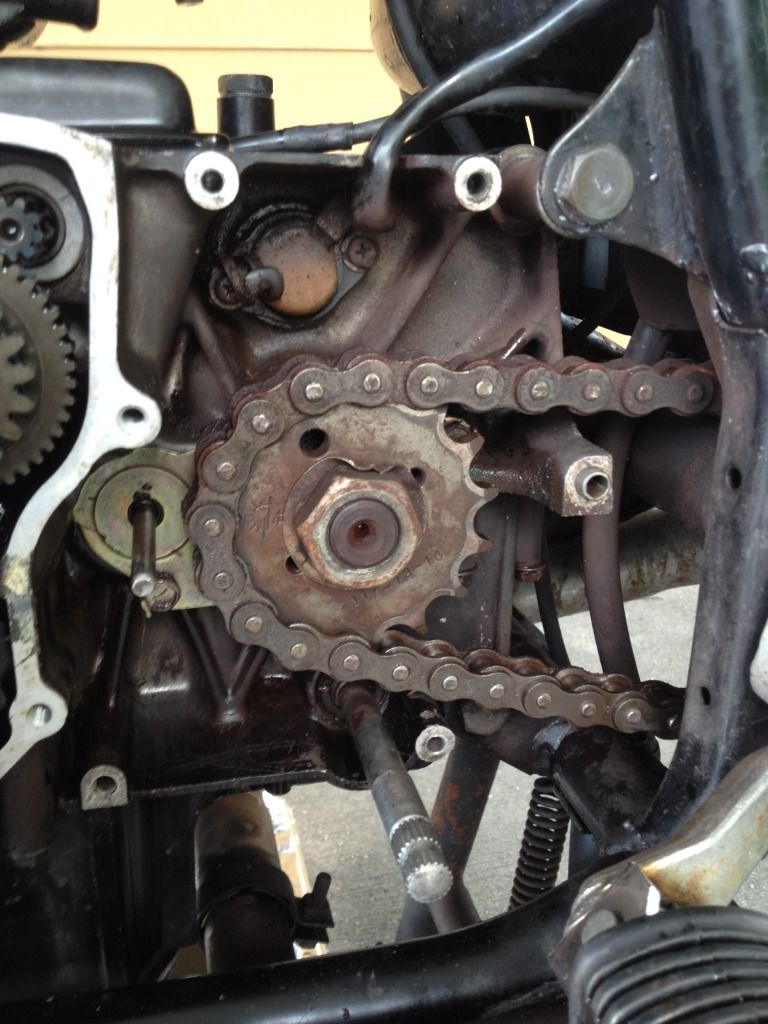
from what i could tell it was leaking form the left side of the engine and seemed to drip from near the shifter shaft(?)
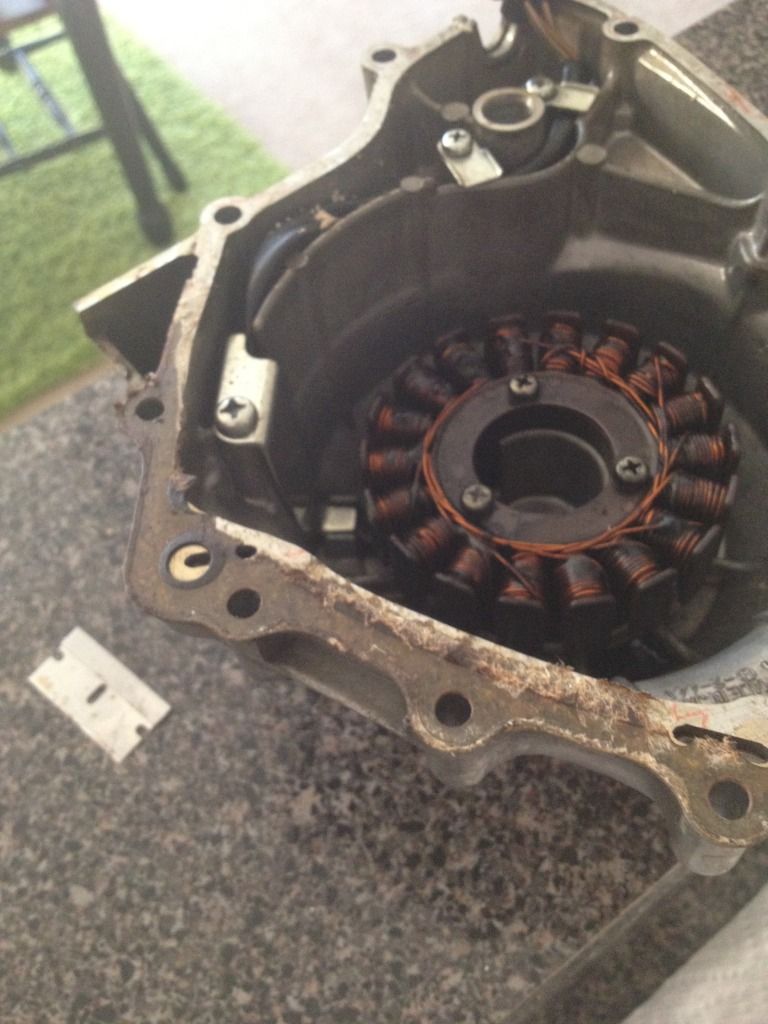
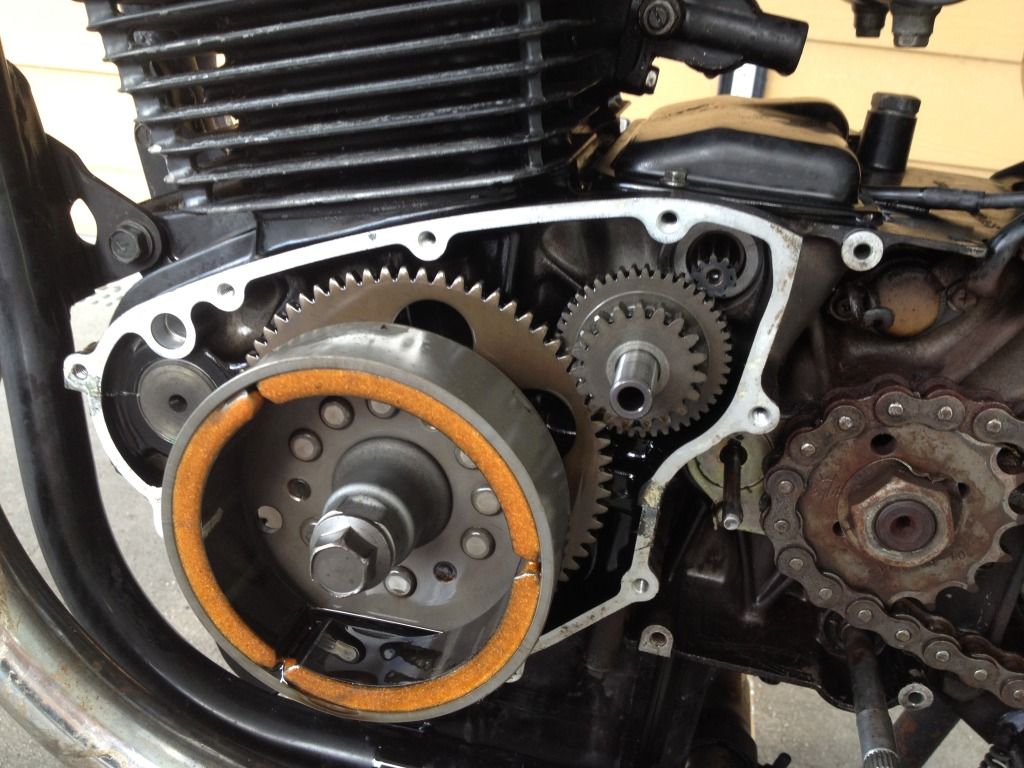
i ordered a new magneto gasket and went ahead and got a clutch cover gasket for the other side as well since there is a very very small accumulation of oil there also.
in the mean time i have cleaned the motor with simple green so i can try to pinpoint any leak. well theres a few. the front left and rear right silver valve cover caps are leaking, the cam chain tensioner is leaking some where, prob just the gasket, and the previously mentioned gaskets.

well while riding a few days ago after work, i was on my way to visit my wife at work and the bike started acting up on me. with the throttle at about 1/4 on it would bog down and lose power. i gave it some more throttle and it kicked back to life and zipped on down the road.also the exhaust started popping like it was back firing when i would let off the throttle and just coast. hmmmm.
well yesterday i made the same ride again and it did the exact same thing but not as often this time.

well today my gaskets came in and i have been sitting here thinking of what to do and how to make it look.

a few slices of pizza, a few brewski's and some good ole cafe racing documentaries in i have decided to start the rebuild.(i dont think ill do a cafe, i just think they are cool)

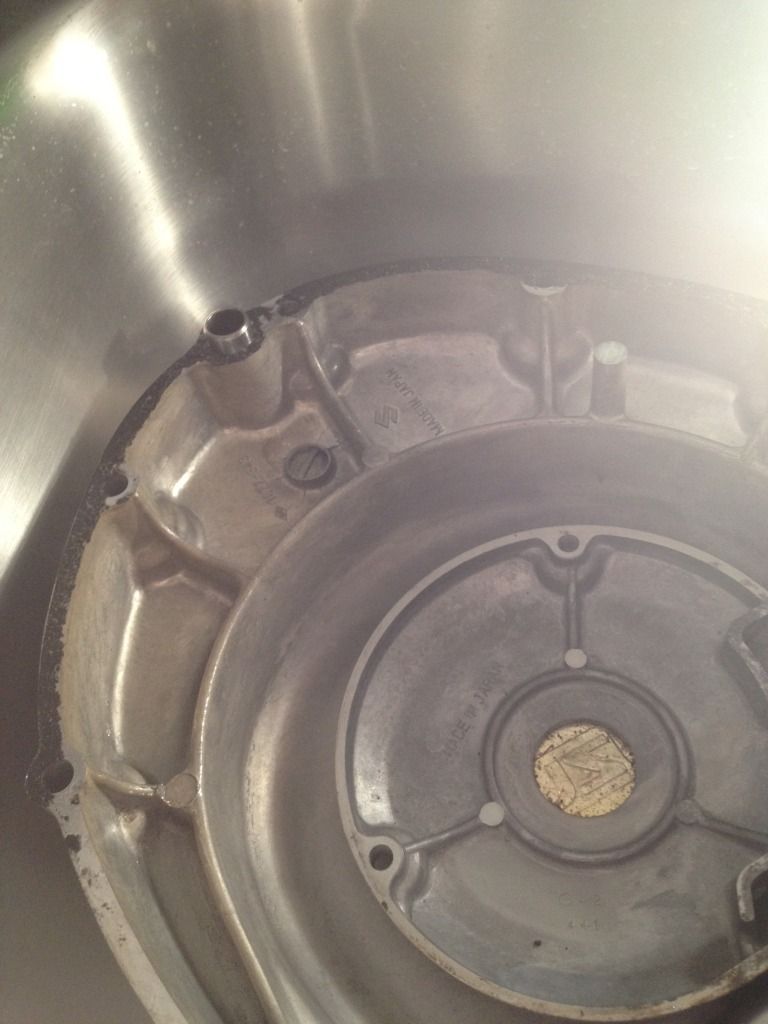
i ran outside and grabbed the first thing to start on since it was getting dark. i replaced the clutch cable the other day and was horrified at the amount of oil and dirt that has accumulated on the chain cover. so i unbolted it and brought it inside to soak.

sorry for such a long intro, about this, agian, i have had a few cold ones and im feeling awfully chatty.
any adivce tips tricks would be awesome. i can handle constructive criticism and want to know all i can.

i have a few pics of the little i have done so far that i will upload on to my photobucket and load on here soon.
 
here's list of what i plan on doing to it as i go down what seems to be a very dark curvy road for me.

this list isnt in any specific order.
let me know if theres anything else i should add to it

~brakes-
change pads/ shoes
bleed lines
install s/s brake lines
rebuild master cylinder/ caliper

~carbs-
dsassemble, clean, replace orings, and possibly paint them

~check chain/sprocket for wear

~new tires

~change any necessary gaskets

~new grips w/ bar ends (po says that PO before him dropped it and broke the end off front brake lever, messed up throttle end)

~new cables (throttle, speedo, tach)

~ new gauges (tach doesnt work)

~check replace shocks/springs

~replace fuel line and add a quick disconnect for easy removal for whatever reason

~ exhaust-
wrap headers, possibly new muffler

~ new spark plugs/ wires
 
also what's the best stuff to soak greasy grimy parts in to get it off? im using simple green right now but its not doing the best.
 
simple green, pine sol, any degreaser, but it won't just come off, you will have to use a bit of elbow grease, and various brushes, scrubbers, etc, use baby bottle cleaners for tight areas, between fins and such, wire brushes only if your painting afterwards.

pin sol for a carb dip on the cheap, unless you can get the better stuff

check out some of the rebuild threads to get more ideas, and what some of us have used and gone through as well

enjoy
 
Glad to see you getting her running right first :)

I use POR 15 Marine Clean. I have a big tub of it mixed up I soak parts in for half an hour or so then hose them down.

And yes, scrubbing still required...
 
Oh I know scrubbing would still be required, when I put the simple green on it, it wasn't strong enough to cut through all the grease so it just smeared it all around. I went to the store and bought a spray can of gunk's engine degreaser and that stuff sure does the trick. I bet if I just used the force of the spray itself I wouldn't have had to scrub, but then I would have needed more cans also.
Well today's task is underway, cleaned the cover, got it primered and now it's waiting for a few coats of dupli-colors semi gloss black engine enamel. I also have the bolts and some badges getting blacked out also. I don't know what style I want the bike to be, but everything needs to be black. IMO nothing looks better( but who knows, maybe I'll do something crazy and use red or something once I figure out the style I'm going for.

Well here in a little bit, I'll load some pics that I have.

I think the next step will either be left and right crank cover gaskets with fresh oil change, or brake work.

I'm a little weary of doing the brakes after reading about all these other people having very spongy brakes after the bleed.
Also where is a good place to pick up ss brake lines?
 
If you do the brakes right, they'll be great. I had no troubles after rebuilding my caliper.

I got a new M/C as mine was shagged and got my SS brake line from a Canadian eBay seller that fit spot on.

Rennsport I think is the company name and a few guys on here have lines from him and they're great.
 
well alright, today i started changing out the clutch cover and magneto gaskets sincei got off work a little bit early.

this is what it started out as
photo.jpg


photo1.jpg


after draining all the oil out, i was thrilled to find what im guessing is almost 30 year old paper gaskets in between everything. so after getting it all drained covered up real nice and cleaned up my public work space (my apartment complex has a shaded car wash area that i think is gonna become my new little work area, only about 150 feet from the stairs to my place) i took everything inside to clean the covers.

look at the chocolate syrup that came out
1342487554.jpg


1342488027.jpg


1342488206.jpg


i got out my razor blade and started scraping away, didnt get me very far.i tried wet sanding a little bit also, the blade worked better so i went back to it. after what seemed like an eternity i was about to get it nice and clean and smooth metal showing

after washing the covers and drying them off, i took them out on my patio and primed them and just put my first coat of black engine enamel on.


how does my sprocket look? im not sure what a worn one will look like
1342487384.jpg


1342487230.jpg


the cat being sleepy like me right now
1342487866.jpg


well thats all for now, any input would be great.
 
Mate it looks nice and clean under the stator cover and the stator doesn't look burnt, although I'd grab your multimeter and test it anyway.

The sprocket looks worn but serviceable, the teeth aren't too pointy.

Is that rust on your chain though? If so, I'd do something about that real quick...
 
Yeah it is a little rusty, what kind of lube should I put on it?

Tomorrow the freshly painted black covers go back on with some fresh gaskets and a new oil filter and new oil.
 
If you can take the chain off, and let it soak in some Kerosene overnight, use a stiff bristle brush to clean up the crap off of it, and then use your favorite lube, I won't mention any as there are as many preferences on that as there are opinions on tires....
 
If you can take the chain off, and let it soak in some Kerosene overnight, use a stiff bristle brush to clean up the crap off of it, and then use your favorite lube, I won't mention any as there are as many preferences on that as there are opinions on tires....

+1 on that. I use Castrol chain wax but that's only because it was on the shelf in the auto store when I went looking...

Be sure to carefully run the chain through several rotations after cleaning and lubing and check for any tight spots. If you have cleaned and lubed properly and there are still tight spots, good chance you'll need a new chain.
 
i put the new gaskets and the engine side covers back on with no problem today, and also put in a new oil filter and filled it up with rotella oil. i think she smiled when i started her up after that.

then i became the impatient a@@hole that i am, and started adjusting the handle bars and flipped them over to give me a lower ride. the elbow fitting for the mc was in the way of then bend and not thinking i thought hey i can just loosen it and rotate it a little. yeah so now i have no brakes in the front since the line is now full of air. good one for me.

then, when i was gonna tighten up the bolt to hold the lever in place i snapped one and now its just flopping around. looks like a visit to boulevard suzuki is in the plan for the night.


awesome
 
Bugger! One thing I learnt very early on in my rebuild was to be very patient and don't rush... that's when you either bust things or forget things...
 
carb day

carb day

after debating when i actually wanted to start the carbs rebuild, i took the bike out and pulled the carbs off. i guess i gotta do it now since they are off. some of those screws are on there good.

thanks for anyone that created the carb rebuild tutorials on basscliffs sit, those are very helpful.

now i just need to order the o ring kit

when i go to soak them, is it alright to use a plastic bucket/ dish or will the carb cleaner eat through that?

heres some pics in no particular order

where does the boot o-ring go?
05dd1e7a.jpg


28b088d3.jpg


84f5e3f7.jpg


2d3d10e1.jpg


took the tank and seat off
6e2470d0.jpg
 
Boot oring is that real flat squashed thing in the middle there.:p

Update: about 2 mm from the inner diameter. You're going to need a pick of some sort to get it out. It will look a lot more like a rubber washer than an oring when you take it out. That's pretty squashed.
 
No need to get anything special for dipping carb parts, the cleaner that you should get comes in a gallon-size can (that has about 3 quarts of liquid in it) that has a basket inside. Open the can, take out the basket. Fill the basket with parts for ONE carb, put the basket back in the dip. Wait 24 hours, take those parts out, put parts for the next carb in. Rinse off the first day's carbs with HOT water, follow that with some carb spray in the various holes, AFTER PUTTING ON YOUR SAFETY GLASSES. Follow the carb spray with some compressed air to dry out the passages. Poke some copper wire strands through the jet holes, rinse with carb spray, dry with air. Repeat on successive days with the rest of the carbs. Assemble carbs with new o-rings from cycleorings.com.

Yes, it takes the better part of a week to properly do the carbs, but if you do it properly ONCE, you won't have to do it again for several years. :D
Try taking 'shortcuts', you will be doing this again and again, until you finally do it properly.

.

Definitely a +1 to this, listen to Steve!

Mind you we don't have Berrymans or anything here, but I was able to get Yamalube carb cleaner which is essentially the same thing but more caustic as you need to dilute it with water.

I bought the cheapest sauce pan and stainless steel strainer I could find from the supermarket and used that for dipping, although I actually simmered mine on a portable hot plate (not recommended!!!!).
 
Back
Top