• Required reading for all forum users!!!

    Welcome!
    Register to access the full functionality of the GSResources forum. Until you register and activate your account you will not have full forum access, nor will you be able to post or reply to messages.

    A note to new registrants...
    All new forum registrations must be activated via email before you have full access to the forum.

    A Special Note about Email accounts!
    DO NOT SIGN UP USING hotmail, outlook, gmx, sbcglobal, att, bellsouth or email.com. They delete our forum signup emails.

    A note to old forum members...
    I receive numerous requests from people who can no longer log in because their accounts were deleted. As mentioned in the forum FAQ, user accounts are deleted if you haven't logged in for the past 6 months. If you can't log in, then create a new forum account. If you don't get an error message, then check your email account for an activation message. If you get a message stating that the email address is already in use, then your account still exists so follow the instructions in the forum FAQ for resetting your password.

    Have you forgotten your password or have a new email address? Then read the forum FAQ for details on how to reset it.

    Any email requests for "can't log in anymore" problems or "lost my password" problems will be deleted. Read the forum FAQ and follow the instructions there - that's what we have one for...

  • Returning Visitors

    If you are a returning visitor who never received your confirmation email, then odds are your email provider is blockinig emails from our server. The only thing that can be done to get around this is you will have to try creating another forum account using an email address from another domain.

    If you are a returning visitor to the forum and can't log in using your old forum name and password but used to be able to then chances are your account is deleted. Purges of the databases are done regularly. You will have to create a new forum account and you should be all set.

1981 gs750 (gs750e) Retro Racer project

This is a picture of how my bike was assembled. Some kind of thick radiator hose sits loosely over the intake boot and carb opening.


48036867868_135740661c_o by Lars Krogh-Stea, on Flickr


Next picture shows my brothers bike (same model and year). This is an airtight assembly:


riktig_muffe by Lars Krogh-Stea, on Flickr


My bike is sucking in lots of unfiltered air and at the same time the intake plenum is not alowed to do its job as it's supposed to. Next picture shows one of the intake boots. It's inside diameter is about 45mm and on the carb the outside diameter is about 53mm. Not an optimal solution..


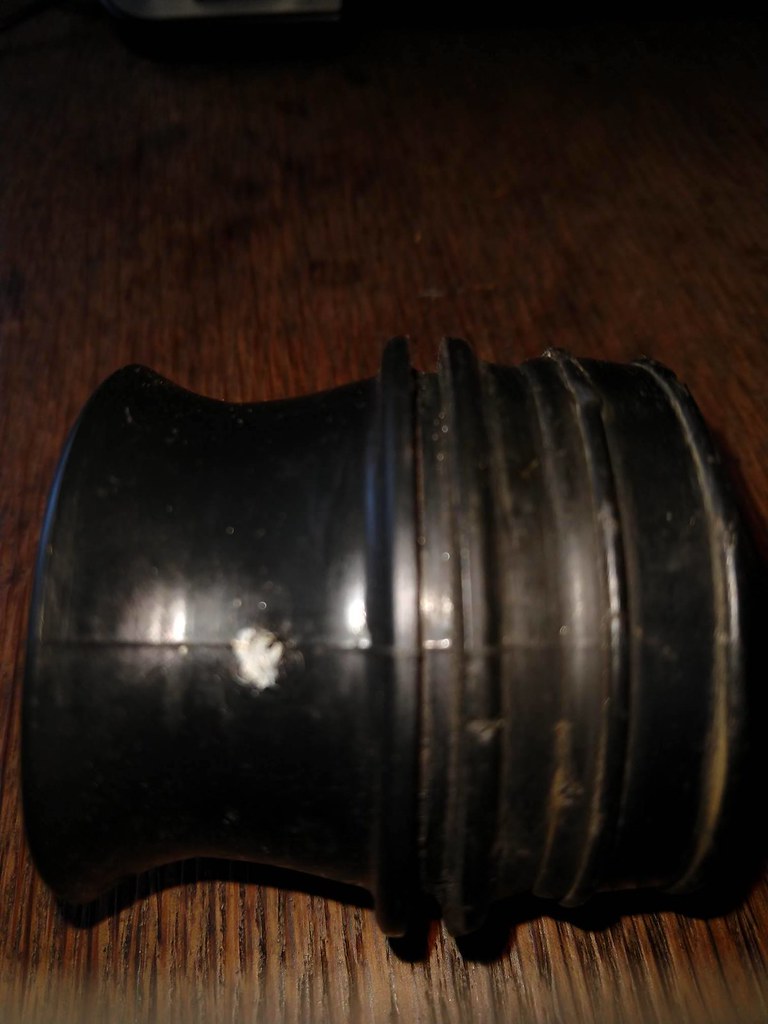
feil_muffe by Lars Krogh-Stea, on Flickr


They don't make a particularly tight connection with the holes in the plenumbox. This is also why gas poured over my engine.. If everything was done correctly, excess fluid would flow out the boots and down the draintube in the bottom of the plenum. One less firehazard to worry about when this is corrected :) Guess the bike will run smoother as well.
 
4 years and your bike ain't rideble yet???
I can't take your project as serious…

Qurious to know the chain of thoughts leading up to that post.. I think I've explained this more than once..
Or are you just angry because you spent your time reading a few posts and now the ending isn't in plain sight?
 
Qurious to know the chain of thoughts leading up to that post.. I think I've explained this more than once..
Or are you just angry because you spent your time reading a few posts and now the ending isn't in plain sight?
Maybe my bad. Right, I just read the last few posts and looks like you've never had the bike on the road.
You titled this thread retro racer, so are you racing the bike?
 
Be sure to only use the type of fuel filter that flows with a gravity feed system. Many of the paper type filters cause a restriction. In the USA the gravity feed system filters are for lawn mowers and machines like that.

Keep going, you are doing a good job...
 
Maybe my bad. Right, I just read the last few posts and looks like you've never had the bike on the road.
You titled this thread retro racer, so are you racing the bike?

No problem
mail
I bought this particular bike because my Brother has the same model.

My brother and I live about 3,5 hours apart and our father lives somewhere between. A little over an hour from my house.
The bikes are in his basement, and we meet up at his house once in a while to work on them. The bike was in OK running shape when i got it.
I rode it the first summer and the i picked it apart to rebuild it. The project, for me, is more about building than riding. Everytime I'm close to getting it on the road some new idea pops up. This summer, however I'm putting it back on the road as a friend of mine got his motorcycle license, and we're planning som daytrips around here.

If you read more posts you will find that much time is spent how the different parts will look and how I'm going to make them. The rearsets for example is CAD drawn and made by me on a CNC router. The pegs are made by me on a lathe. Both are stuff I had to learn while i was doing it. The seat is the first part that I've ever welded, and the seat I made on my wifes sewingmachine wile looking at a youtube wideo. My 13 year old daughter showed me how to thread the machine. I've also built the weels from OLD and new parts and powderdoated the parts with I kit I bought. I've recently bought an anodising kit, and when the top triple is finished I will anodise it and the rearset and write text on them with a laser engraver a friend of mine has. So you see, it's more about the process than the end for me.

But as I said, it will be on the road in a few weeks, so if you're interested, just follow the thread.

For the racing part, it's only inthe name. I thought it would be wrong to call it a cafe racer, so I came up with something similar that I think sounds cool ;)

I also have a GSXR750 USD fork with Yamaha R1 brakes that I'll finish together with Cognito moto front wheel next winter.
 
Be sure to only use the type of fuel filter that flows with a gravity feed system. Many of the paper type filters cause a restriction. In the USA the gravity feed system filters are for lawn mowers and machines like that.

Keep going, you are doing a good job...

Thank you :) And I'll keep in mind the info about the fuel filter.
 
First test run on the road. Tank and seat are stowed away until all the wiring and cables are routed correctly. I'm quite happy with the seating position. Work done today is; 520 conversion, mounting brakes, throttle and clutch. Next time is carb tuning :) After that cable routing and finishing.


Last edited:
Can't answer about the Kerker, but looking good.
That block of foam seat reminds me of how I'd do the seat of a vintage racer. The AHRMA rules require using the OEM seat pan. For track racing a firm seat is much preferred for moving side to side and feeling the suspension reacting to the road. I'd wanna shape closed cell foam like that over the seat pan.
Too hard for use on public roads however.
 
Yes, the original boots shrink and harden like that. On my 850, those boots shrunk so much that they just fell through the openings in the airbox.

New boots fitted perfectly again!
 
Today I mounted the rest of the parts needed to take it for a real test run.


Choke; I'll find a better better place to mount it when the tank is on.
2019-07-06_11-11-16 by Lars Krogh-Stea, on Flickr


2019-07-06_11-11-06 by Lars Krogh-Stea, on Flickr


Made the seat a little more comfortable ;)


2019-07-06_11-10-50 by Lars Krogh-Stea, on Flickr


Ready for tuning :)


2019-07-06_11-10-06 by Lars Krogh-Stea, on Flickr


2019-07-06_11-09-51 by Lars Krogh-Stea, on Flickr

Hooked up a Gopro on the bike and had a camera in a car behind me. The carbs need syncing and mid range tuning, but I'll leave that for later. I'm hoping to ride it home next week. Watch the movie till the end for a couple of pictures of the bike with tank and seat.


2019-07-06_11-09-29 by Lars Krogh-Stea, on Flickr
 
While I'm waiting for the next trip to the garage, I've ordered some new tools. I want to use safety-wire on the rear sprocket and the caliperbolts, maybe other things too. I ordered drill guides for both nuts and bolts from Ebay. Tested it today, and it worked great. Didn't drill all the way through because I only had a hand drill and I didn't want to waste the drill bit (hard to keep straight when it breaks through). I'm waiting till I can mount it in the pillar drill so it'll stay in place and not break the drillbit. Here's the halfdrilled nut and the tools:


2019-07-15_10-24-38 by Lars Krogh-Stea, on Flickr


2019-07-15_10-24-47 by Lars Krogh-Stea, on Flickr


2019-07-15_10-24-27 by Lars Krogh-Stea, on Flickr


Also got som JIS screwdrivers for those dot-marked japanese screwheads:


2019-07-15_10-25-27 by Lars Krogh-Stea, on Flickr
 
Hard to see, but somewhere inside all this spaghetti is my M-unit. There wasn't much room left after mounting the rear master and air-filter.


2019-07-15_11-53-49 by Lars Krogh-Stea, on Flickr


The suloution I believe is to make a tray for it under the tank. Easiest way seems to be to bend and pop-rivet a box and put it between the tubes, over the plenum-box. It's a good location too because most of the wires goes to the front. I'll make some kind of quick-lock device so I can pop off the tank when I need access to the M-unit (last picture). I've also mounted a quick-release fuel line coupler with dual ball-valves, so the tank is easily removable.


2019-07-15_10-25-50 by Lars Krogh-Stea, on Flickr


M-unit passering 2 by Lars Krogh-Stea, on Flickr


kawasaki_tankpinBK_650x370 by Lars Krogh-Stea, on Flickr
 
This is my plan for the speedometer signal pickup. I've cut out the bottom of a speedometer and removed the magnet. I'll make a disc from plastic and fasten the magnet in it. Then I'll mount the reed switch in the base plate. It would be cool if I can get it to fit inside the headlight, that would give a cool analog look to a digital solution.


IMG_20190720_150324 by Lars Krogh-Stea, on Flickr
 
Back
Top